Manufacturing Quality Inspection Workflow: A Step-by-Step Guide
Publicado: 03/30/2026 Actualizado: 03/31/2026
Índice
- Introduction: Why a Robust Quality Inspection Workflow Matters
- 1. Retrieve the Inspection Plan
- 2. Assigning the Right Inspector
- 3. Fetching Product Specifications: Ensuring Accuracy
- 4. Inspection Execution: Following the Plan
- 5. Recording Inspection Results: Detailed Documentation
- 6. Updating Product Status: Real-Time Visibility
- 7. Creating a Non-Conformance Report (NCR): Addressing Failures
- 8. Assigning Rework/Repair Tasks: Correcting Deficiencies
- 9. Recording Rework/Repair Details: Tracking Improvements
- 10. Retrieving Previous Inspection History: Learning from Past Experiences
- 11. Generating the Inspection Report: A Comprehensive Overview
- 12. Notifying the Quality Manager: Keeping Stakeholders Informed
- 13. Calculating Defect Rate & Updating Batch Quality Score
- 14. Reviewing Non-Conformance Reports (NCR) & Continuous Improvement
- Resources & Links
TLDR: This workflow streamlines your manufacturing quality inspections, from receiving the plan to generating reports and managing non-conformances. It ensures consistent inspection processes, accurate record-keeping, and provides data-driven insights to improve product quality and identify areas for process optimization - all while keeping everyone informed and accountable.
Introduction: Why a Robust Quality Inspection Workflow Matters
In today's competitive manufacturing landscape, consistent product quality isn's just desirable - it's essential. A breakdown in quality can lead to costly recalls, damaged reputation, dissatisfied customers, and ultimately, lost revenue. While rigorous quality checks are vital, simply performing them isn't enough. A structured and well-defined quality inspection workflow provides the backbone for ensuring those checks are consistently executed, thoroughly documented, and effectively actioned upon.
Without a robust workflow, you risk inconsistencies in inspection processes, difficulty tracking defects, and a lack of actionable data to drive continuous improvement. This can lead to inefficiencies, increased scrap rates, and a reactive approach to quality management. A proactive, documented workflow, on the other hand, provides clear accountability, streamlines processes, enables data-driven decision-making, and ultimately builds trust in your products and your brand. This article will delve into a comprehensive manufacturing quality inspection workflow, outlining each step and highlighting its importance in achieving optimal product quality.
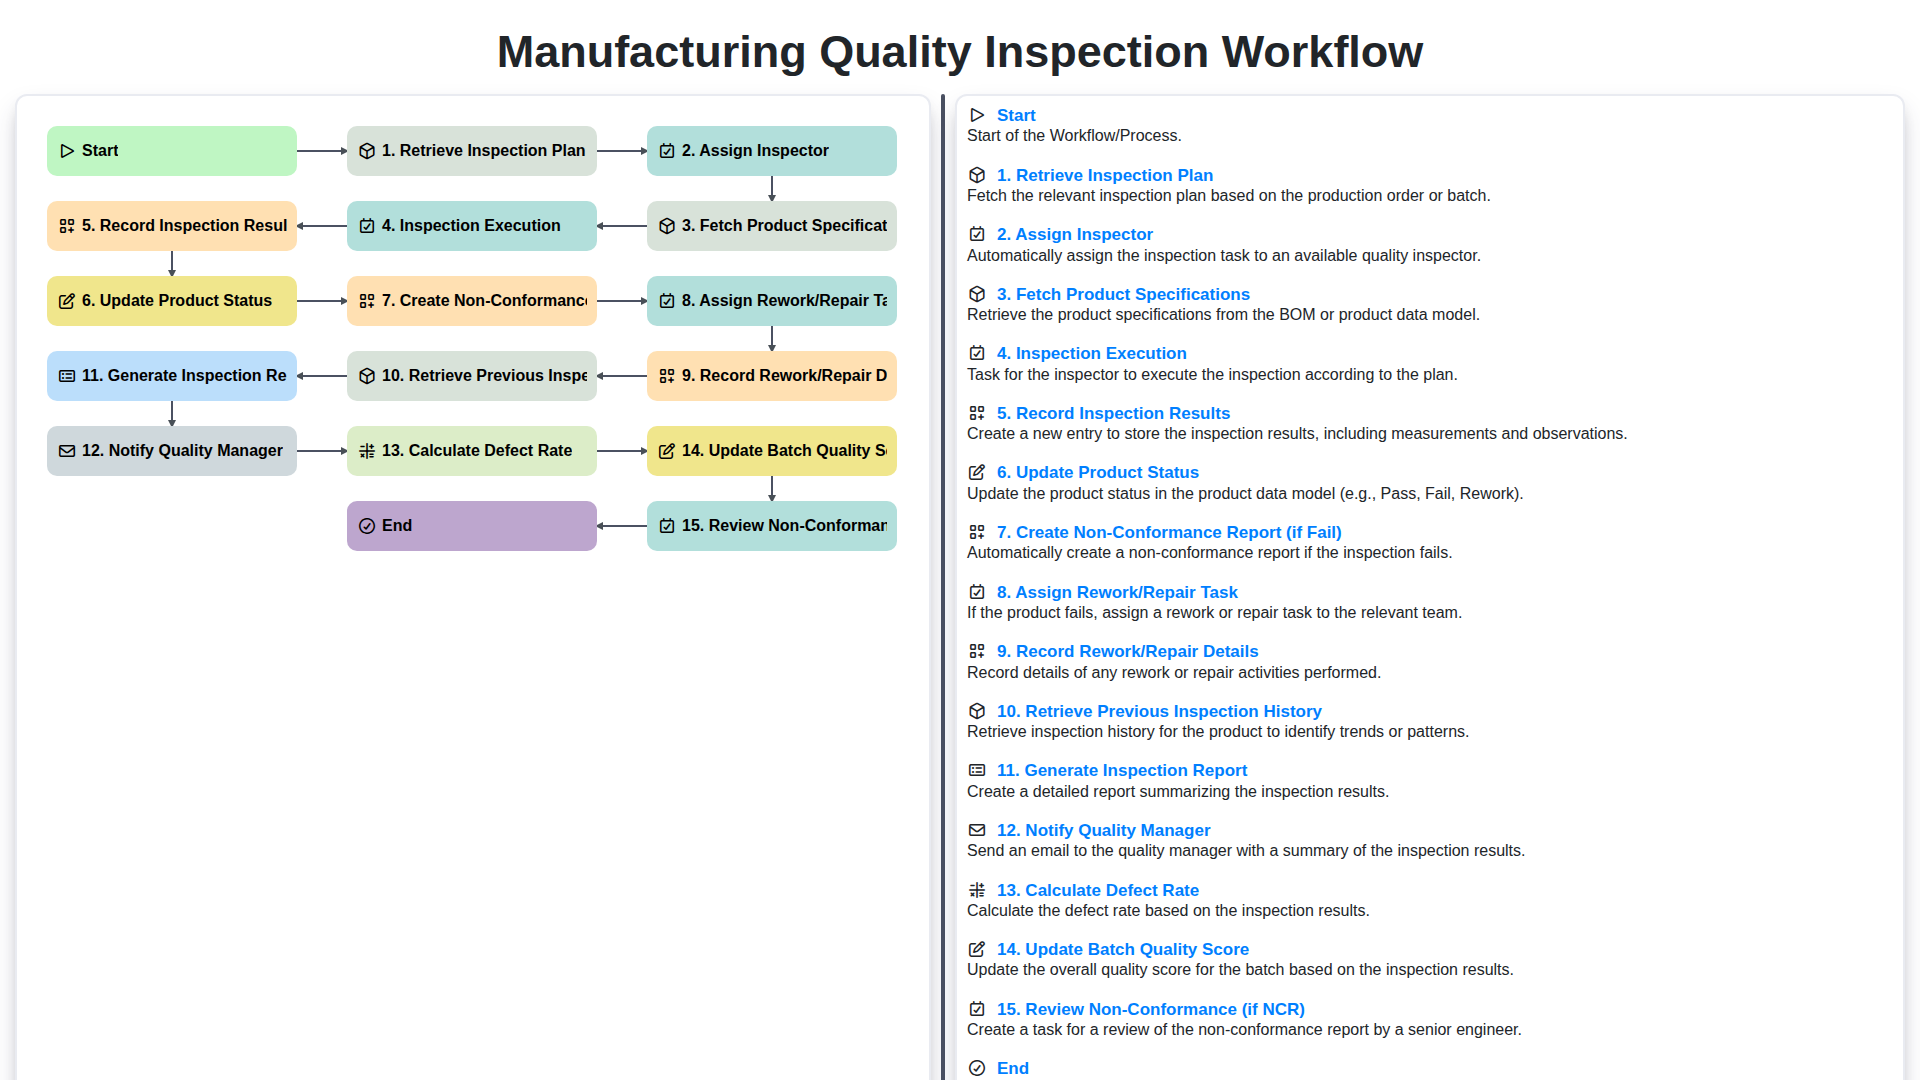
1. Retrieve the Inspection Plan
Before any physical inspection can begin, the process starts with retrieving the relevant inspection plan. This plan acts as the roadmap for the entire quality check, outlining what aspects of the product are to be assessed, the acceptable quality limits, and the methods of measurement. Typically, this involves accessing a centralized system - often a Manufacturing Execution System (MES) or Quality Management System (QMS) - using a unique product identifier (like a serial number or batch code). The system will then pull the corresponding inspection plan, ensuring the inspector is working with the correct parameters and criteria for the specific product batch. This initial step guarantees consistency and prevents errors stemming from using incorrect standards. The plan often includes detailed checklists, drawing references, and specific test procedures, providing a clear and concise guide for the inspector.
2. Assigning the Right Inspector
The effectiveness of your quality inspection hinges on having the right person performing it. Simply assigning an inspector based on availability isn't enough; it's about aligning skills and experience with the product's complexity and the inspection plan's requirements.
Here's how to ensure you're assigning inspectors strategically:
- Skillset Matching: Does the inspector possess the necessary expertise? For example, a complex electronic assembly requires a different skillset than a visual inspection of molded plastic parts. Consider factors like experience with specific measurement tools (CMM, gauges, vision systems) and knowledge of relevant industry standards.
- Product Familiarity: Inspectors who have worked with a particular product line previously will have a head start, recognizing potential issues and understanding nuanced specifications.
- Calibration & Training: Ensure inspectors are properly trained on inspection procedures and have valid calibration certificates for any tools they use. Regular refresher training is also vital.
- Workload Balancing: Avoid overwhelming individual inspectors. Implement a system to distribute inspection tasks fairly and prevent burnout, which can lead to overlooked details.
- Record Keeping: Maintain a clear record of inspector skills, training, and certifications to facilitate informed assignment decisions. A skills matrix can be a valuable tool here.
By strategically assigning inspectors, you're not just completing a task; you're safeguarding product quality and minimizing potential risks.
3. Fetching Product Specifications: Ensuring Accuracy
Before an inspector even lays eyes on a product, they need the definitive source of truth: the product specifications. This isn't just a formality; it's a critical step that directly impacts the validity and consistency of the inspection. Simply put, how can an inspector determine if a product meets requirements if they don't know what those requirements are?
The process of fetching product specifications should be automated and directly linked to the inspection plan. Ideally, the system should retrieve the latest approved version of the specifications, preventing confusion caused by outdated documents. This could involve pulling data from a Product Lifecycle Management (PLM) system, an ERP module, or a centralized engineering database. Key information retrieved should include dimensional tolerances, material specifications, performance criteria, visual appearance guidelines, and any relevant regulatory standards.
Ensuring the correct specifications are being used is paramount. The system should incorporate version control, timestamps, and user verification to confirm the integrity of the data. Furthermore, providing the inspector with a clear, accessible display of the specifications - perhaps in a digital checklist or interactive format - streamlines the inspection process and minimizes errors. A human error here can cascade into a cascade of inaccurate inspection results, impacting product quality and potentially leading to costly recalls.
4. Inspection Execution: Following the Plan
This is where the hands-on work happens. Guided by the retrieved inspection plan (which outlines specific tests, measurements, and acceptance criteria), the assigned inspector meticulously examines the product. This isn't just a visual check; it's a systematic process.
The plan dictates the order of inspections, the tools to be used (e.g., calipers, gauges, microscopes), and the frequency with which certain features are assessed. Inspectors must adhere strictly to these guidelines to ensure consistency and accuracy. They're looking for deviations from the product specifications, identifying any imperfections, and documenting their findings.
Clear and concise observation is key. Inspectors shouldn't just note a defect exists; they should detail what the defect is (e.g., scratch, dent, discoloration), where it's located, and how severe it is. This detailed documentation is crucial for later analysis and corrective action. Special attention is paid to critical features, often highlighted in the inspection plan, to ensure they meet the required tolerances.
5. Recording Inspection Results: Detailed Documentation
Accurate and detailed record-keeping is the backbone of any successful quality inspection workflow. During the "Inspection Execution" phase, inspectors are diligently observing and assessing products against predetermined criteria. This data needs to be captured meticulously.
The "Recording Inspection Results" step isn't just about ticking boxes; it's about providing a complete audit trail. This includes, but is not limited to:
- Specific Defects Identified: Clearly describe each defect found, using standardized terminology whenever possible. Avoid vague terms; be precise about the location, severity, and characteristics of the issue. Photos or videos are invaluable here, providing visual evidence for later review.
- Measurements & Dimensions: Record all measurements taken during the inspection, comparing them against the defined specifications. Include units of measurement and the tool used for measurement.
- Inspector's Signature/ID: Each inspection record should be clearly linked to the individual inspector, ensuring accountability and traceability.
- Date and Time: Timestamp the record for accurate chronological tracking.
- Lot/Batch Number: Link the results directly to the specific product batch being inspected.
- Digital vs. Paper Records: While paper records still exist, digital systems are increasingly favored. Digital records offer enhanced searchability, reduced errors, and easier integration with other quality management systems.
Proper recording ensures that all stakeholders have access to the information needed for analysis, corrective action, and continuous improvement.
6. Updating Product Status: Real-Time Visibility
A crucial step in maintaining quality and efficiency is the immediate update of product status throughout the inspection workflow. Following inspection execution and recording of results, the product's status shifts - from "Awaiting Inspection" to "Inspected," then potentially to Passed, Failed, or "Rework/Repair Required." This real-time visibility is paramount for several reasons.
Firstly, it allows other departments - like production, logistics, and sales - to understand precisely where each product stands in the process. Knowing whether a product has passed inspection or is undergoing rework avoids bottlenecks and facilitates proactive planning. Secondly, it enables rapid response to issues. If a batch of products fails inspection, stakeholders are immediately alerted, enabling prompt investigation and corrective action.
Our system automatically updates the product status, eliminating manual paperwork and reducing the risk of errors. This ensures that everyone involved has access to the most current information, fostering collaboration and driving continuous improvement in manufacturing processes. Traceability is also significantly enhanced - knowing the full history and status changes for each product provides invaluable data for analysis and future quality initiatives.
7. Creating a Non-Conformance Report (NCR): Addressing Failures
When an inspection fails to meet the defined acceptance criteria, the process immediately shifts to creating a Non-Conformance Report (NCR). This isn't just about documenting the failure; it's the crucial first step in corrective action.
The NCR should meticulously detail the failure. This includes the product identifier (serial number, batch number), the specific inspection point where the failure occurred, the observed defect (be as descriptive as possible - include photos or videos if possible), the inspector's assessment, and the date and time of the failure. Clear, unambiguous documentation is vital for traceability and effective problem-solving.
The NCR should be formally documented within the quality management system and assigned a unique identifier for tracking. It's important to identify the root cause of the defect, even at this initial stage. While a thorough root cause analysis might follow later, a preliminary assessment helps prioritize the issue and potentially prevent immediate recurrence.
The NCR acts as a formal trigger for investigation and corrective action. It ensures that the failure isn't simply ignored and that the necessary steps are taken to prevent similar occurrences in the future. The system should automatically route the NCR to the appropriate personnel for review and action - typically an engineer or quality specialist.
8. Assigning Rework/Repair Tasks: Correcting Deficiencies
Once a non-conformance is identified and a Non-Conformance Report (NCR) is created, the focus shifts to corrective action. This is where assigning rework or repair tasks becomes crucial. The process isn't simply about handing off the flawed product; it's a carefully orchestrated step within the quality inspection workflow.
The assigned rework/repair task clearly defines the problem - referencing the NCR and specific inspection findings. This ensures the technician understands exactly what needs to be corrected. The task should include:
- Detailed Description of the Issue: Beyond just Defect Found, describe the specific flaw, its location, and its potential impact.
- Required Action: Clearly outline the steps needed to rectify the defect. This might involve re-machining, re-welding, replacement of a component, or other specific actions.
- Assigned Technician/Team: A specific individual or team responsible for the rework or repair.
- Estimated Completion Time: A realistic timeframe for the work to be completed, considering complexity and resource availability.
- Required Tools & Materials: Listing necessary resources avoids delays.
The assignment should be tracked within the system, ensuring accountability and monitoring progress. Crucially, the system should allow for documenting any difficulties encountered during the rework/repair process and allowing the technician to request clarification or additional resources. This feedback loop is vital for continuous improvement within the manufacturing process.
9. Recording Rework/Repair Details: Tracking Improvements
Once a rework or repair task has been assigned, meticulous record-keeping is crucial. This section details how to document the corrective actions taken. Information to capture includes: the date and time of rework/repair, the specific actions performed (e.g., re-welding, re-machining, component replacement), the tools and materials used, and the name of the technician who completed the work. Detailed descriptions of the repair process itself are essential - vague entries like fixed it are completely inadequate. Photographs or video recordings can provide further context and are highly recommended. This detailed record provides a traceable audit trail, allows for analysis of recurring issues, and helps identify training needs for technicians. It also serves as valuable reference material should similar problems arise in the future, preventing repeated troubleshooting and saving time. Linking these repair details back to the original inspection and non-conformance report (NCR) ensures a complete and unified view of the problem-solving process.
10. Retrieving Previous Inspection History: Learning from Past Experiences
Every product batch, and even individual products, carries a history. Understanding that history - specifically, previous inspection results - is crucial for continuous improvement and proactive quality management. Retrieving and reviewing past inspection data isn't just about knowing what happened before; it's about identifying trends, root causes of recurring defects, and verifying the effectiveness of previous corrective actions.
During the inspection workflow, the system should automatically retrieve the product's, or batch's, inspection history. This history should include details like:
- Previous Inspection Dates & Results: A chronological record of past inspections, including pass/fail status and any notes from previous inspectors.
- Defect Trends: Identifying specific defects that have appeared repeatedly in the past. Are certain features consistently problematic?
- Corrective Actions: Records of any previous non-conformance reports (NCRs) and the actions taken to address them. Did these actions effectively resolve the underlying issue?
- Inspector Notes: Valuable insights from previous inspectors regarding potential issues or anomalies observed.
By analyzing this history, inspectors can gain a deeper understanding of the product's quality profile and potential risks. This allows them to tailor their inspection approach, pay closer attention to areas of concern, and contribute to a more effective overall quality control process. Furthermore, this historical data is invaluable for quality engineers when investigating persistent quality issues and implementing long-term improvements.
11. Generating the Inspection Report: A Comprehensive Overview
The final step in the manufacturing quality inspection workflow culminates in the generation of a comprehensive inspection report. This report isn't just a formality; it's a critical document providing valuable insights into product quality, process efficacy, and potential areas for improvement.
The report's generation draws data from every preceding step in the workflow. This includes the retrieved inspection plan, the inspector's assigned tasks, the fetched product specifications, the recorded inspection results, and any non-conformance details. It integrates information from rework/repair tasks, previous inspection history, and the calculated defect rate, ultimately feeding into the batch quality score.
A well-structured inspection report should clearly and concisely present the following:
- Basic Information: Product name, batch number, date and time of inspection, inspector's name.
- Inspection Details: Reference to the inspection plan used, the product specifications checked against, and a summary of the inspection process.
- Results Summary: A clear overview of the inspection results - passed, failed, or conditionally passed - with a detailed breakdown of individual checks and their outcomes.
- Non-Conformance Details: If a non-conformance report (NCR) was created, the report should reference the NCR number and a brief description of the issue.
- Rework/Repair Details: If rework or repair was required, the report should outline the tasks performed and the results achieved.
- Defect Rate and Quality Score: Display the calculated defect rate and the updated batch quality score.
- Previous History: A short excerpt from the retrieved previous inspection history, highlighting trends and past performance.
- Sign-off: Spaces for the inspector and quality manager to sign off on the report, confirming accuracy and completeness.
The generated report is then disseminated to relevant stakeholders - including the quality manager, production team, and potentially even customers - providing transparency and facilitating data-driven decision-making. Furthermore, the report serves as a vital historical record, enabling trend analysis and continuous quality improvement efforts.
12. Notifying the Quality Manager: Keeping Stakeholders Informed
A critical, often overlooked, step in a robust manufacturing quality inspection workflow is timely notification of the Quality Manager. This isn't simply about sending an email; it's about ensuring the right individuals are informed at the right time, enabling proactive problem-solving and preventing escalation of issues.
The notification should occur immediately following the record of inspection results, especially if non-conformance is detected. This notification should include a summary of the inspection findings, highlighting the product(s) affected, the specific defects found, and the severity level (if applicable). Automated notifications, triggered by system events, are ideal for ensuring promptness and consistency.
The purpose isn't to burden the Quality Manager with minute details of every inspection. Instead, it's to flag potential concerns that require their attention - whether that's a trend in defects, a cluster of failures within a batch, or a particularly critical non-conformance. This allows the Quality Manager to investigate further, determine if additional action is needed (such as a temporary production halt or process adjustment), and maintain overall quality control.
Ultimately, proactive communication builds trust and transparency between inspection teams and management, strengthening the overall quality system.
13. Calculating Defect Rate & Updating Batch Quality Score
Once inspections are complete and results are recorded, it's crucial to quantify the overall quality of the batch. This isn't just about knowing if individual products failed; it's about understanding the systemic quality of the entire production run.
Calculating the Defect Rate:
The defect rate is a simple yet powerful metric. It's calculated by dividing the number of defective products identified during inspection by the total number of products inspected within the batch.
Formula: Defect Rate = (Number of Defective Products / Total Number of Products Inspected) * 100
For example, if you inspected 500 products and found 20 with defects, your defect rate would be (20/500) * 100 = 4%.
Updating the Batch Quality Score:
The defect rate is then used to update the batch quality score. This score serves as a key performance indicator (KPI) for the production process. The scoring system can be customized to align with your company's standards, but generally follows a tiered approach.
Here's a sample tiered system:
- Excellent: Defect Rate < 1%
- Good: Defect Rate 1% - 3%
- Acceptable: Defect Rate 3% - 5%
- Marginal: Defect Rate 5% - 7%
- Unacceptable: Defect Rate > 7%
This scoring system allows for quick visual assessment of quality trends and facilitates data-driven decision-making to identify areas for improvement in the manufacturing process. A consistently low batch quality score might trigger a deeper investigation into the root causes of defects.
14. Reviewing Non-Conformance Reports (NCR) & Continuous Improvement
The creation of a Non-Conformance Report (NCR) is a critical step, but it's just the beginning of the quality process. The review of these reports is where the real learning and improvement happen. This stage isn't just about ticking a box; it's about identifying systemic issues and preventing future occurrences.
The NCR review should involve a cross-functional team, including representatives from quality, production, engineering, and potentially even the relevant supplier. This team should meticulously analyze the root cause documented in the NCR. Was it a material defect? A process deviation? Insufficient training? Equipment malfunction? Don't just address the immediate symptom; dig deeper to understand why the issue arose.
Key elements of an effective NCR review:
- Verification: Confirm the findings detailed in the NCR are accurate and complete.
- Root Cause Analysis: Conduct a thorough investigation using tools like the 5 Whys or Ishikawa (fishbone) diagrams.
- Corrective Action Planning: Define specific, measurable, achievable, relevant, and time-bound (SMART) corrective actions to prevent recurrence. This might involve process adjustments, equipment upgrades, training updates, or supplier collaboration.
- Responsibility & Deadlines: Assign clear responsibility for each corrective action and establish realistic deadlines for completion.
- Effectiveness Verification: After implementation, actively monitor the effectiveness of the corrective actions. Track relevant metrics (like defect rates) to ensure the issue has been resolved and doesn't re-emerge.
This process isn't just about fixing problems; it's about building a culture of continuous improvement. The lessons learned from NCR reviews should be shared across the organization to proactively prevent similar issues in other areas and refine the entire manufacturing quality inspection workflow. Regular analysis of NCR trends can highlight areas for process optimization and strengthen overall product quality.
Resources & Links
- ISO (International Organization for Standardization) : The leading international organization for the development and publication of standards. Provides frameworks for quality management systems (like ISO 9001) that directly inform robust inspection workflows.
- NIST (National Institute of Standards and Technology) : Provides standards, measurements, and research to advance innovation and competitiveness. Relevant for understanding measurement accuracy and statistical process control used in quality inspection.
- ASQ (American Society for Quality) : A global community dedicated to quality. Offers resources, training, and certifications related to quality management, including inspection processes.
- Quality America : Provides various quality management solutions and resources, including articles and whitepapers related to inspection workflows and quality control.
- APQC (American Productivity & Quality Center) : A research organization focused on process improvement. They often publish case studies and benchmarks related to manufacturing processes, including quality inspection.
- SAE International : Develops standards for the automotive, aerospace, and commercial vehicle industries. Relevant for industries requiring stringent inspection processes.
- FDA (U.S. Food and Drug Administration) : Regulates and provides guidance on quality control for industries like food, drugs, and cosmetics. Provides valuable insight for heavily regulated manufacturing environments.
- Quality Digest : An online publication focused on quality management, process improvement, and related topics. Features articles and resources relevant to quality inspection workflows.
- IQPC (International Quality & Productivity Conferences) : Organizes conferences and provides resources related to quality management and manufacturing processes. Can offer insights into current trends and best practices.
- Make UK (formerly EEF - Employers' Federation) : Represents UK manufacturers and provides resources on quality management, including best practices for inspection and process control. Offers valuable data and insights relevant to manufacturing operations.
Preguntas frecuentes
What is a manufacturing quality inspection workflow?
A manufacturing quality inspection workflow is a structured, step-by-step process used to verify that products meet predefined specifications, safety standards, and quality requirements throughout the production lifecycle.
What are the key stages of a standard quality inspection process?
A standard workflow typically includes Incoming Quality Control (IQC) for raw materials, In-Process Quality Control (IPQC) during production, Final Quality Control (FQC) after manufacturing, and Outgoing Quality Assurance (OQA) before shipment.
Why is In-Process Quality Control (IPQC) important?
IPQC is crucial because it allows manufacturers to detect defects early in the production cycle. By identifying errors during assembly, companies can prevent large-scale waste, reduce rework costs, and ensure that the final product remains within tolerance.
What is the difference between Quality Control (QC) and Quality Assurance (QA)?
Quality Control (QC) focuses on identifying defects in the actual products through inspection and testing, whereas Quality Assurance (QA) focuses on the processes used to create the products to prevent defects from occurring in the first place.
How can a company improve its quality inspection workflow?
Companies can improve their workflow by implementing automated inspection technologies (such as Machine Vision), utilizing Statistical Process Control (SPC), training staff regularly, and using data analytics to identify recurring failure patterns.
What should be done when a product fails inspection?
When a failure is detected, the workflow should trigger a non-conformance report (NCR), followed by a root cause analysis (RCA) to determine why the defect occurred, and finally, a corrective action plan to prevent recurrence.
¿Te resultó útil este artículo?
Demostración de la solución de gestión de la fabricación
¡Deje de lidiar con papeleo y sistemas desconectados! Nuestra solución aporta claridad y control a su proceso de producción. Desde procedimientos operativos estándar (SOP) y mantenimiento de equipos hasta control de calidad y seguimiento de inventario, simplificamos cada paso.
Artículos relacionados
Plantilla de lista de verificación Kaizen: Su camino hacia la mejora continua

Machine Safety Audit Checklist: Your Guide to a Safer Manufacturing Workplace
Mastering Supplier Performance: Your Free Supplier Scorecard Checklist Template
Tu plantilla definitiva de lista de verificación de RCM: Una guía paso a paso

Plantilla de verificación LPA: Su guía para auditorías de procesos por capas

Tu plantilla definitiva de control de aislamiento energético (LOTO)

Your Ultimate FSC 22000 Checklist Template
Plantilla de Lista de Verificación para Inspección de Control de Calidad: Prevenir Defectos y Mejorar los Procesos de Fabricación
Podemos hacerlo juntos
¿Necesita ayuda con las listas de verificación?
¿Tienes alguna pregunta? Estamos aquí para ayudarte. Envía tu consulta y te responderemos a la brevedad.