Production Line Downtime Analysis Workflow: A Step-by-Step Guide
Published: 03/30/2026 Updated: 03/31/2026
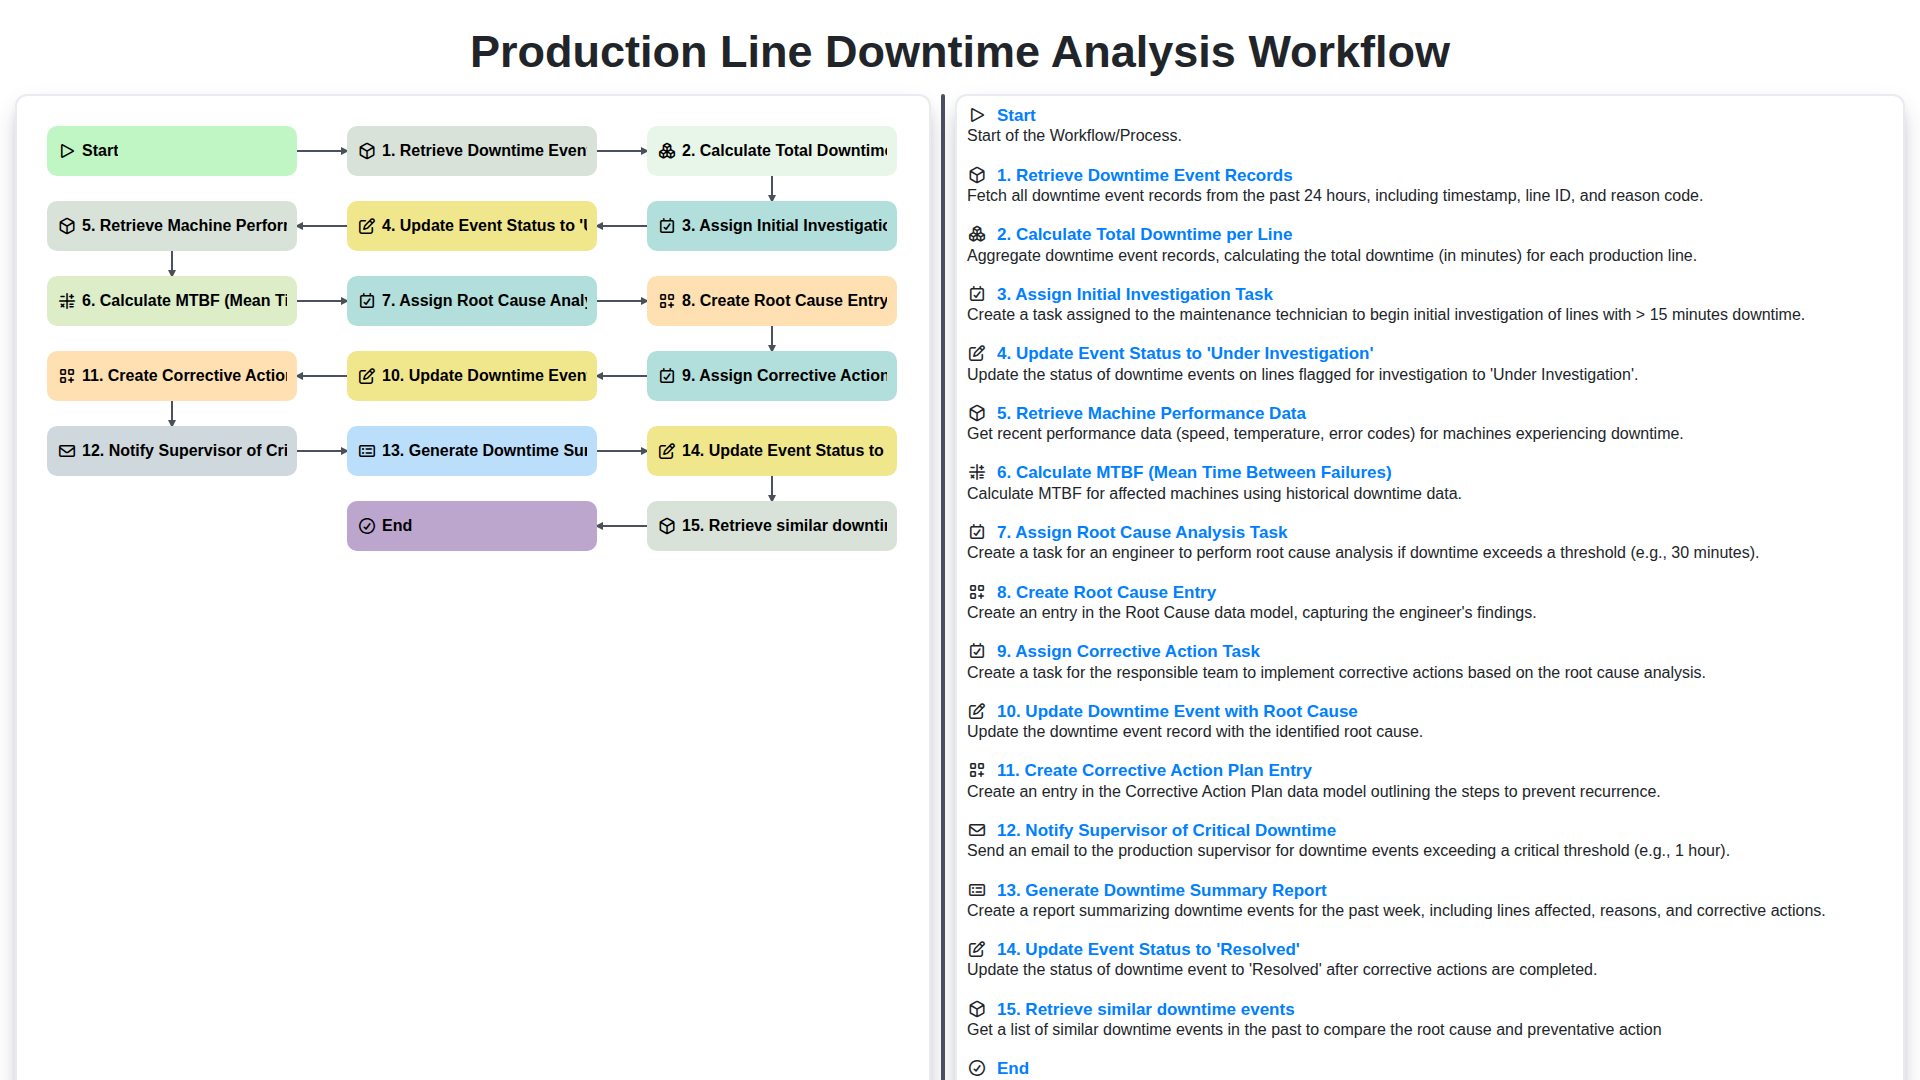
Table of Contents
- Introduction: The Cost of Downtime
- Workflow Overview: A Structured Approach
- Step 1: Retrieve Downtime Event Records
- Step 2: Calculate Total Downtime per Line
- Step 3: Assign Initial Investigation Task
- Step 4: Update Event Status to 'Under Investigation'
- Step 5: Retrieve Machine Performance Data
- Step 6: Calculate MTBF (Mean Time Between Failures)
- Step 7: Assign Root Cause Analysis Task
- Step 8: Create Root Cause Entry
- Step 9: Assign Corrective Action Task
- Step 10: Create Corrective Action Plan Entry
- Step 11: Update Downtime Event with Root Cause
- Step 12: Notify Supervisor of Critical Downtime
- Resources & Links
TLDR: This workflow streamlines downtime analysis on your production lines. It automatically tracks downtime events, calculates key metrics like MTBF, assigns investigation and corrective action tasks, identifies root causes, and generates reports - all to minimize future disruptions and maximize efficiency.
Introduction: The Cost of Downtime
Production line downtime is a silent killer of profitability. It's not just about the lost production during the outage; it's about the ripple effect - delayed shipments, frustrated customers, rushed restarts, and the potential for quality issues. Even seemingly short interruptions, when aggregated across a production line or entire facility, can represent a significant drain on resources and bottom-line profits. Understanding and actively reducing downtime isn't just about improving efficiency; it's about safeguarding your business's competitiveness and ensuring consistent output. This blog post will detail a robust workflow designed to not only track downtime but also to systematically analyze it, identify root causes, and implement effective corrective actions, ultimately minimizing its impact and maximizing uptime.
Workflow Overview: A Structured Approach
Keeping a production line running smoothly is critical to meeting demand and maximizing profitability. Unplanned downtime, however, is an unavoidable reality. But reacting to downtime effectively - analyzing it, correcting it, and preventing recurrence - can dramatically reduce its impact. This blog post details a structured workflow for downtime analysis, designed to move beyond reactive troubleshooting and toward proactive problem solving.
Here's a breakdown of the process we'll be exploring:
- Retrieve Downtime Event Records: The process begins with collecting accurate records of each downtime event.
- Calculate Total Downtime per Line: Understanding the overall downtime for each production line provides a baseline for improvement efforts.
- Assign Initial Investigation Task: A preliminary assessment is assigned to identify the immediate cause and scope of the issue.
- Update Event Status to 'Under Investigation': This tracks the event's progress and ensures accountability.
- Retrieve Machine Performance Data: Gathering operational data leading up to the downtime provides valuable context.
- Calculate MTBF (Mean Time Between Failures): Tracking this key metric helps identify trends and potential areas of weakness.
- Assign Root Cause Analysis Task: A deeper investigation is launched to determine the true underlying reason for the failure.
- Create Root Cause Entry: Documenting the identified root cause ensures a clear understanding of the problem.
- Assign Corrective Action Task: Responsibility for implementing solutions is assigned.
- Create Corrective Action Plan Entry: A detailed plan outlining actions and timelines is created.
- Update Downtime Event with Root Cause: The event record is updated with the findings of the root cause analysis.
- Notify Supervisor of Critical Downtime: Key stakeholders are alerted to significant downtime events.
- Generate Downtime Summary Report: Regular reports provide insights into downtime trends and the effectiveness of corrective actions.
- Update Event Status to 'Resolved': The event is marked as resolved after corrective actions are implemented and validated.
- Retrieve similar downtime events: Leveraging historical data to anticipate and prevent similar issues proactively.
By systematically following these steps, we can transform downtime from a frustrating setback into a learning opportunity, optimizing production line performance and minimizing disruptions.
Step 1: Retrieve Downtime Event Records
The foundation of any effective downtime analysis is accurate and complete data. This begins with retrieving downtime event records. These records should capture crucial details like the line affected, the start and end times of the downtime, a brief description of the issue, and the operator who initially reported it.
Where these records are stored will vary depending on your facility - it could be a dedicated CMMS (Computerized Maintenance Management System), a spreadsheet, a database, or even a paper-based log. The key is to have a centralized and easily accessible location. Automation here is a huge advantage. Ideally, downtime event records are automatically generated when a line stops or when an operator triggers a downtime flag through a user interface. This eliminates manual data entry, reducing errors and saving valuable time. Regardless of the system, ensure the data being collected is consistent and comprehensive.
Step 2: Calculate Total Downtime per Line
To effectively analyze downtime, we need a clear picture of how much time each production line is actually not producing. This step, calculating total downtime per line, forms a crucial foundation for identifying problem areas.
We aggregate all downtime event records for each production line within a defined period (e.g., daily, weekly, monthly). This aggregation includes the start and end times for each downtime event, allowing us to precisely calculate the duration of each outage. The total downtime is simply the sum of these individual downtime durations for each line. This total is then presented alongside other line performance metrics, enabling easy comparison and highlighting lines experiencing disproportionately high downtime. This provides a crucial benchmark against which further analysis can be performed. It's not just about if a line goes down, but how long it's down.
Step 3: Assign Initial Investigation Task
Once a downtime event is identified and the total downtime per line is calculated, the next crucial step is to assign an initial investigation task. This isn't a deep dive root cause analysis - that comes later. Instead, this task is focused on gathering preliminary information. The assigned individual (often a maintenance technician or a designated team member) should focus on the what, when, and who of the downtime.
Specifically, they should document:
- Observations: What was happening on the line immediately before, during, and after the downtime?
- Error Messages: Were any error messages displayed on the machine's HMI or control system? Record these verbatim.
- Operator Input: What did the line operators observe? Their insights are invaluable and should be accurately recorded.
- Initial Checks: Perform basic, quick checks - things like power supply, connections, and obvious mechanical issues.
- Potential Contributing Factors: Any initial thoughts or hypotheses about what might have caused the downtime.
This initial investigation provides a foundation for the more detailed root cause analysis and prevents wasted time with irrelevant avenues later on. It also lays the groundwork for better communication across teams.
Step 4: Update Event Status to 'Under Investigation'
Once an initial investigation task is assigned, it's crucial to formally acknowledge that the downtime event is being actively addressed. Updating the event status to 'Under Investigation' serves several vital functions. First, it provides clear visibility across the team; everyone knows the event isn't just recorded, but actively being looked into. This prevents duplicate efforts and ensures accountability. Second, it triggers subsequent automated steps within the workflow, such as notifications to specific personnel or the generation of preliminary reports. Finally, it's a critical data point for tracking workflow efficiency - monitoring the time events spend in the 'Under Investigation' state helps identify bottlenecks and areas for process improvement. This simple status change is a fundamental step in ensuring a proactive and organized response to production line downtime.
Step 5: Retrieve Machine Performance Data
To properly assess the impact and potential causes of downtime, we need to gather detailed performance data for the affected machine or production line. This isn't just about if it was running; it's about how it was running. We're looking for trends and anomalies leading up to the downtime event.
Specifically, this step involves retrieving data such as:
- Cycle Times: Examining individual cycle times to identify slowdowns or deviations from established norms.
- Throughput: Tracking the number of units processed per hour/shift to see if throughput decreased prior to failure.
- Error Rates: Monitoring machine error messages, rejects, and rework counts.
- Sensor Readings: Pulling data from relevant sensors (temperature, pressure, vibration, etc.) which could indicate mechanical stress or performance degradation.
- Power Consumption: Analyzing power usage patterns for unusual spikes or drops that might signify issues.
The data source for this information will vary depending on your facility - it might come from a Manufacturing Execution System (MES), Programmable Logic Controllers (PLCs), Supervisory Control and Data Acquisition (SCADA) systems, or other machine-specific monitoring tools. The more granular and historical the data, the better equipped we'll be to understand the events leading up to the downtime.
Step 6: Calculate MTBF (Mean Time Between Failures)
Calculating MTBF is a crucial step in understanding downtime patterns and predicting future issues. MTBF, or Mean Time Between Failures, represents the average time a machine or production line operates without interruption. To calculate it, we take the total operating time over a defined period and divide it by the number of failures during that same period.
Here's the formula:
MTBF = Total Operating Time / Number of Failures
For example, if a production line operated for 1,000 hours in a month and experienced 5 downtime events, the MTBF would be 200 hours (1000 / 5 = 200).
It's vital to accurately track both operating time and downtime events for this calculation to be meaningful. We're leveraging the downtime event records collected in Step 1, and pulling associated machine performance data (detailed in Step 6) to ensure a comprehensive view. A declining MTBF signals a potential problem - increased maintenance frequency, aging equipment, or process issues - warranting further investigation. Conversely, a consistently high MTBF indicates reliability and effective preventative maintenance.
Step 7: Assign Root Cause Analysis Task
Once the initial investigation has gathered preliminary information and ruled out immediate, obvious causes, the downtime event requires a deeper dive - a Root Cause Analysis (RCA). This isn't about assigning blame; it's about systematically identifying the fundamental reason the equipment failed.
The 'Assign Root Cause Analysis Task' step involves creating a dedicated task, typically assigned to a maintenance engineer or a specialized RCA team. This task should include all gathered information from the initial investigation (event records, performance data, maintenance logs) and a clear directive to thoroughly investigate and document potential root causes. The RCA task should also include a deadline and any necessary resources (e.g., access to schematics, specialized diagnostic tools). This focused effort ensures a detailed and accurate assessment of why the failure occurred, moving beyond surface-level symptoms.
Step 8: Create Root Cause Entry
Once the Root Cause Analysis Task is assigned and the investigation has yielded potential causes, it's crucial to formally document these findings. This is where the Root Cause Entry is created. This isn't just about writing down what might be the problem; it's about detailed, verifiable information.
The Root Cause Entry should include:
- Detailed Description of the Failure: A clear and comprehensive explanation of what happened during the downtime event.
- Potential Root Causes: List all identified possibilities, even seemingly minor ones. Don't dismiss anything at this stage.
- Supporting Evidence: Reference specific data, observations, or witness statements that support each potential root cause. This could include machine performance data, maintenance logs, operator reports, or visual inspections.
- Severity Rating: Assign a rating (e.g., low, medium, high) based on the potential impact of each root cause.
- Investigator's Notes: Any observations or thoughts from the investigator that might be relevant to determining the true root cause.
- Associated Downtime Event ID: Clearly link the entry to the specific downtime event it addresses.
This meticulous record becomes a vital resource for future analysis, preventative maintenance, and training. It builds a knowledge base that allows your team to learn from past failures and proactively prevent future downtime.
Step 9: Assign Corrective Action Task
Once the root cause of the downtime event has been identified and documented, the next crucial step is to assign a corrective action task. This isn't just about identifying what went wrong, but also about actively planning and executing a solution.
The assigned task should clearly outline the corrective actions required, including specifics like:
- Action Items: What needs to be done (e.g., replace a faulty part, recalibrate a sensor, update a process).
- Responsible Party: Who is accountable for completing each action item.
- Due Date: A realistic timeframe for completion, considering the urgency and resource availability.
- Required Resources: List any tools, materials, or personnel needed.
This task should be assigned to the appropriate individual or team, often involving maintenance personnel, engineers, or process specialists. The system should allow for tracking of progress on the assigned task, including the ability to add comments and updates. This transparency keeps everyone informed and helps ensure accountability for resolving the issue and preventing future occurrences.
Step 10: Create Corrective Action Plan Entry
Once the root cause has been identified and documented, the next crucial step is to formalize the corrective actions into a structured plan. This isn't just about listing actions; it's about creating a roadmap for resolution. A dedicated Corrective Action Plan entry should be created within the downtime management system, containing the following key elements:
- Action Items: Specific, measurable, achievable, relevant, and time-bound (SMART) actions to address the root cause. Be granular - break down large actions into smaller, manageable tasks.
- Assigned Responsibility: Clearly assign each action item to a specific individual or team.
- Due Dates: Establish realistic deadlines for each task, accounting for resource availability and complexity.
- Resources Required: Document any necessary materials, tools, or expertise needed to complete the action.
- Estimated Cost: Include an estimated cost associated with each corrective action, aiding in budget allocation and prioritization.
- Dependencies: Note any dependencies between action items - if one task must be completed before another can begin.
- Tracking Mechanism: Define how progress on each action item will be monitored and reported (e.g., status updates, checklists, visual boards).
This structured entry ensures accountability, facilitates tracking, and provides a clear record of the planned remediation efforts. It moves beyond simply identifying the problem to actively addressing it with a defined plan of action.
Step 11: Update Downtime Event with Root Cause
Once the Root Cause Analysis Task is completed and a root cause has been identified, it's crucial to formally document this finding within the downtime event record. This step ensures transparency, facilitates future analysis, and provides a clear audit trail.
Within our workflow, this involves directly updating the downtime event record with the identified root cause. This might include adding a detailed description of the problem, the specific component or process contributing to the failure, and a reference to the Root Cause Entry created earlier. Using standardized terminology and codes for root causes helps with data consistency and allows for trend analysis. This crucial step closes the loop on the initial investigation and sets the stage for implementing corrective actions.
Step 12: Notify Supervisor of Critical Downtime
Not all downtime is created equal. While every minute lost impacts productivity, certain events - those exceeding pre-defined thresholds in duration or frequency - demand immediate attention from leadership. This step integrates a crucial escalation protocol.
The workflow is configured to automatically trigger a notification to the relevant supervisor (or designated contact) when downtime events meet specific criteria. These criteria might include:
- Exceeding a Maximum Duration: If a line's downtime surpasses a set time limit (e.g., 30 minutes, 1 hour), a notification is sent.
- Reaching a Frequency Threshold: If a line experiences a certain number of downtime events within a defined period (e.g., 3 events in a shift), the supervisor is alerted.
- Impact on Critical Products/Processes: Downtime affecting the production of high-value or time-sensitive products automatically triggers escalation.
These notifications contain vital information like the affected line, the nature of the issue, and the current status of the investigation. This ensures supervisors are promptly aware of critical situations, allowing them to allocate resources, adjust production schedules, and make informed decisions to minimize overall impact. The automated nature of this notification removes the risk of human oversight and ensures timely response to serious production disruptions.
Resources & Links
- ISO 26262 (Functional Safety) : While primarily for automotive, ISO 26262 provides a framework for managing safety-related systems, offering relevant principles for understanding and mitigating risks leading to downtime.
- Reliability Works : A consultancy specializing in reliability engineering and maintenance strategies. Their site offers valuable insights on MTBF, MTTR, and predictive maintenance - all crucial for downtime analysis.
- MT Beacon : Provides asset performance management (APM) software and consulting. Their expertise focuses on optimizing equipment reliability and reducing unplanned downtime.
- APICS (The Association for Supply Chain Management) : Offers resources and certifications related to operations management and supply chain efficiency. Understanding overall production flow helps contextualize downtime impacts.
- Maintenance.com : A comprehensive resource for maintenance professionals. Offers articles, forums, and product information relevant to preventative and corrective maintenance strategies.
- Predictive Maintenance Pro : Provides insights and solutions for implementing predictive maintenance programs, a key aspect of proactive downtime reduction.
- Plant Maintenance Resource Center : A website dedicated to providing information and resources for plant maintenance professionals, covering topics from equipment reliability to CMMS best practices.
- Computerized Maintenance Management Systems (CMMS) : CMMS software is often integral to executing the downtime analysis workflow. This link provides an overview of what CMMS systems are and their capabilities.
- Smartsheet : A popular platform for workflow management and collaboration, useful for tracking and managing downtime analysis tasks, particularly for smaller operations or as a starting point before dedicated CMMS implementation.
Frequently Asked Questions
What is production line downtime analysis?
Production line downtime analysis is a systematic process of identifying, measuring, and investigating periods when manufacturing equipment is non-operational to determine the root causes and implement corrective actions.
What are the first steps in a downtime analysis workflow?
The process begins with data collection and categorization, where you identify all instances of downtime and classify them into categories such as mechanical failure, material shortages, or scheduled maintenance.
How can manufacturers differentiate between planned and unplanned downtime?
Planned downtime includes scheduled activities like preventative maintenance and changeovers, whereas unplanned downtime refers to unexpected events like machine breakdowns or power outages.
Which KPIs are most important for analyzing downtime?
Key performance indicators (KPIs) such as Mean Time Between Failures (MTBF), Mean Time To Repair (MTTR), and Overall Equipment Effectiveness (OEE) are essential for measuring downtime impact.
What is the role of Root Cause Analysis (RCA) in this workflow?
Root Cause Analysis is a critical step used to dig deeper than the symptoms of a failure to identify the underlying issue, preventing the same downtime event from recurring.
How can a company prevent frequent production line downtime?
Prevention strategies include implementing predictive maintenance programs, regular staff training, optimizing supply chain management, and investing in high-quality, reliable machinery.
Found this Article helpful?
Manufacturing Management Solution Demo
Stop chasing paperwork and wrestling with disconnected systems! Our solution brings clarity and control to your production process. From standard operating procedures (SOPs) and equipment maintenance to quality control and inventory tracking, we simplify every step.
Related Articles
Kaizen Checklist Template: Your Path to Continuous Improvement

Machine Safety Audit Checklist: Your Guide to a Safer Manufacturing Workplace
Mastering Supplier Performance: Your Free Supplier Scorecard Checklist Template
Your Ultimate RCM Checklist Template: A Step-by-Step Guide

LPA Checklist Template: Your Guide to Layered Process Audits

Your Ultimate Lockout/Tagout (LOTO) Checklist Template

Your Ultimate FSC 22000 Checklist Template
Quality Control Inspection Checklist Template: Prevent Defects & Improve Manufacturing Processes
We can do it Together
Need help with
Checklists?
Have a question? We're here to help. Please submit your inquiry, and we'll respond promptly.