Mastering Efficiency: A Comprehensive Guide to the Customer Support Ticket Escalation Workflow
Published: 06/04/2026 Updated: 06/05/2026
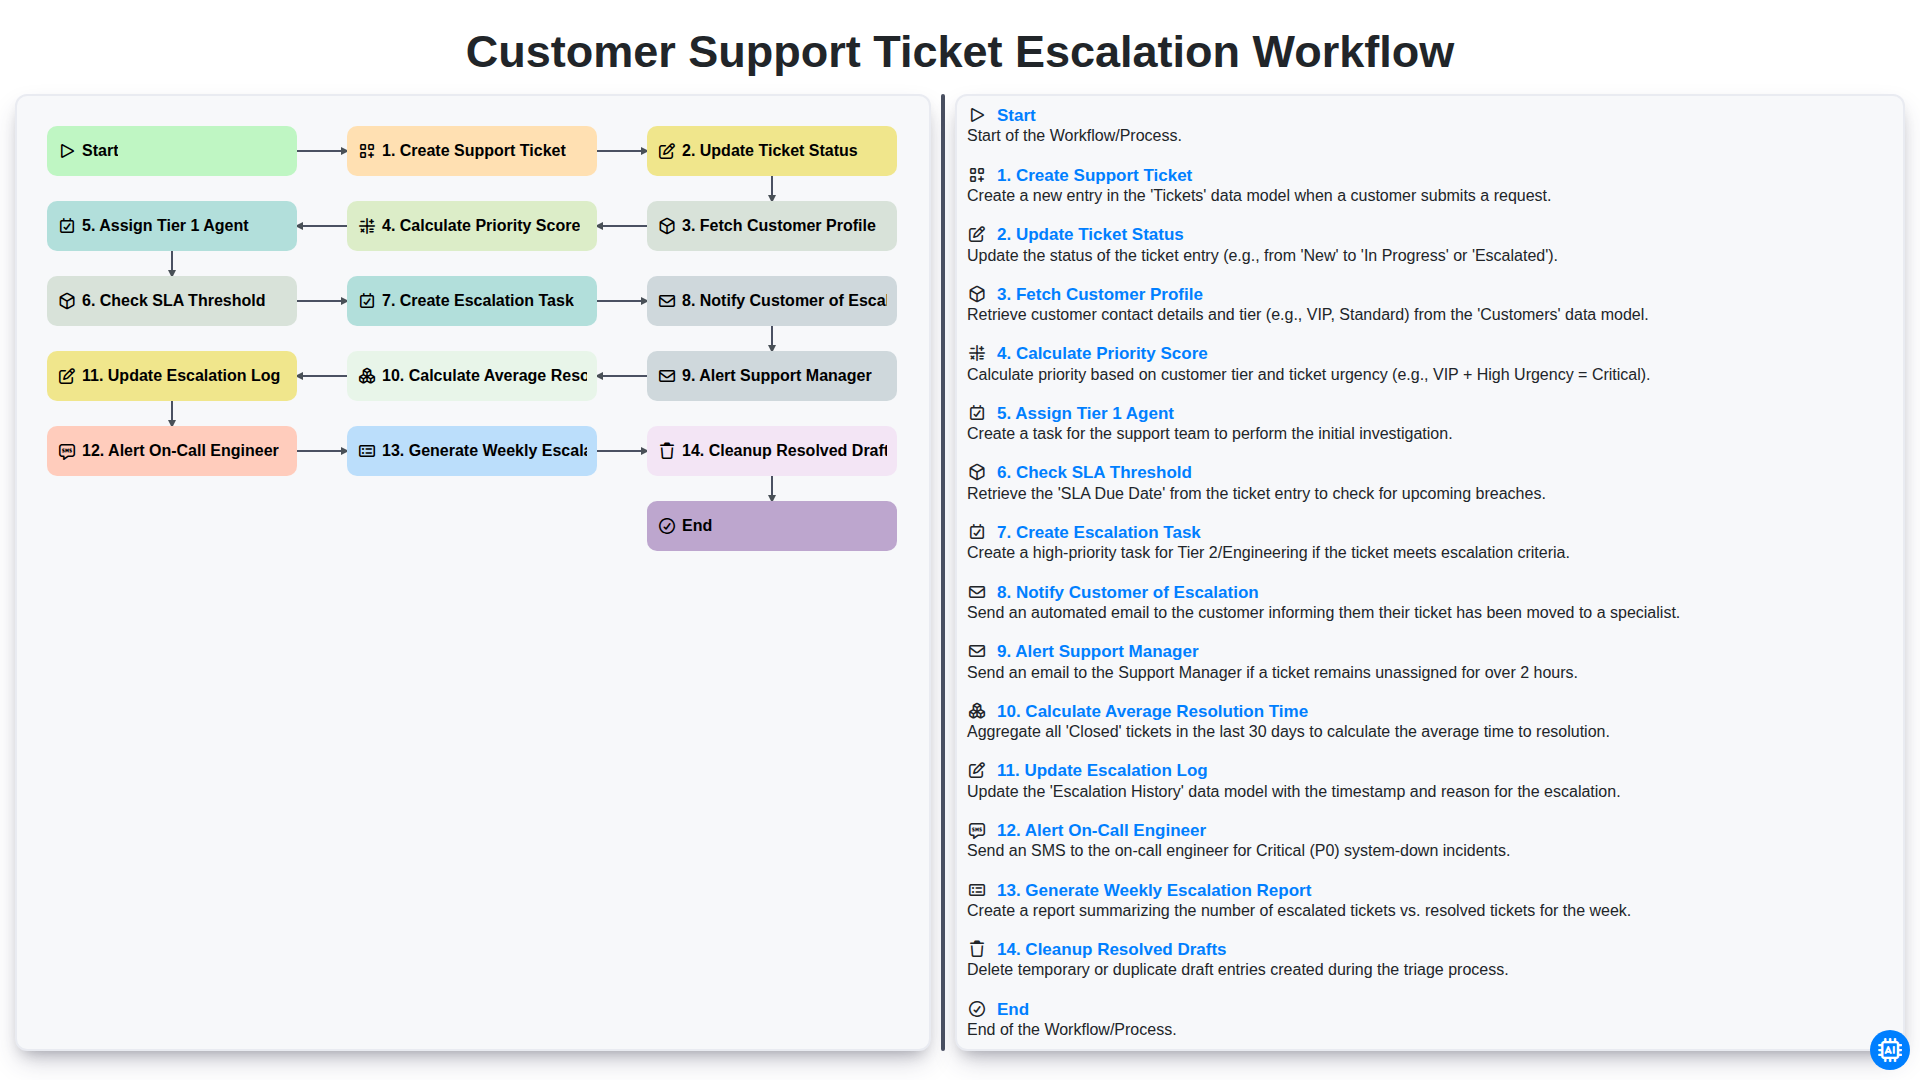
Table of Contents
- Introduction: The Importance of a Structured Escalation Workflow
- Phase 1: Incident Initiation and Initial Assessment
- Step 1: Creating the Support Ticket
- Step 2: Fetching Customer Profiles for Contextual Support
- Step 3: Determining Urgency through Priority Score Calculation
- Phase 2: Initial Response and Tier 1 Handling
- Step 4: Assigning Tier 1 Agents and Managing Ticket Status
- Step 5: Monitoring SLA Thresholds to Prevent Breaches
- Phase 3: The Escalation Trigger and Notification Chain
- Step 6: Creating Escalation Tasks and Alerting Support Managers
- Step 7: Notifying Customers to Maintain Transparency
- Step 8: Deploying On-Call Engineers for Critical Issues
- Phase 4: Post-Escalation Documentation and Process Optimization
- Step 9: Updating Escalation Logs and Analyzing Resolution Time
- Step 10: Reporting, Cleanup, and Continuous Improvement
- Resources & Links
TLDR: Streamline your support operations with this automated workflow template designed to eliminate bottlenecks. Learn how to transition from initial ticket creation to advanced engineer alerts through a structured, step-by-step process that automates priority scoring, SLA monitoring, and manager notifications to ensure no critical issue goes unresolved.
Introduction: The Importance of a Structured Escalation Workflow
In the fast-paced world of customer service, inconsistency is the enemy of satisfaction. When a customer reaches out with a critical issue, they aren't just looking for a response-they are looking for a resolution. Without a predefined path for handling complex problems, support requests can easily fall through the cracks, leading to missed deadlines, frustrated users, and overwhelmed support teams.
A structured Customer Support Ticket Escalation Workflow acts as the backbone of a high-performing support organization. It transforms a chaotic influx of queries into a predictable, automated, and measurable process. By implementing a clear escalation framework, companies can ensure that simple queries are handled swiftly by frontline agents, while high-stakes technical hurdles are systematically routed to the right engineers before they breach Service Level Agreements (SLAs).
Beyond just solving problems, a robust workflow provides much-needed visibility. It empowers managers to track performance through data-driven insights, such as average resolution times and escalation frequency, allowing for continuous improvement of both your product and your people. Ultimately, a well-oiled escalation process turns potential PR disasters into opportunities to demonstrate reliability and professionalism.
Phase 1: Incident Initiation and Initial Assessment
The lifecycle of a successful resolution begins the moment a customer reaches out with an issue. The first phase of our escalation workflow focuses on transforming a raw inquiry into an actionable, prioritized task. This stage is critical because the accuracy of the initial assessment dictates the efficiency of the entire downstream process.
The process begins with the Create Support Ticket step, where all incoming queries-whether via email, chat, or phone-are captured into a centralized system. Once the ticket exists, the system immediately moves to Fetch Customer Profile, pulling essential metadata such as subscription tier, historical interactions, and account importance. This context is vital for understanding the potential impact of the issue.
To eliminate human bias and ensure urgency is handled objectively, the workflow then performs a Calculate Priority Score. By analyzing variables such as the customer's importance and the nature of the reported problem, the system assigns a weighted value to the ticket. With this score determined, the workflow proceeds to Assign Tier 1 Agent, routing the ticket to the frontline specialist best equipped to handle standard inquiries.
During this initial triage, the system also performs a vital Check SLA Threshold operation. By comparing the time elapsed since creation against the predefined Service Level Agreement (SLA) limits, the system determines if the ticket is at risk of breaching its deadline. This proactive monitoring ensures that no issue sits idle long enough to become a critical failure.
Step 1: Creating the Support Ticket
The lifecycle of a successful resolution begins at the very first point of contact. The Create Support Ticket stage is the foundation of the entire escalation workflow. This step occurs the moment a customer reaches out through any supported channel-be it email, live chat, a web form, or a social media integration.
During this phase, the system captures essential data points, including the customer's initial query, the time of the request, and the specific category of the issue. A well-structured creation process ensures that no request falls through the cracks, as it immediately converts unstructured communication into a trackable, actionable entity within your support ecosystem. This step is critical because the quality of the data captured here directly impacts the accuracy of every subsequent step, from priority calculation to agent assignment.
Step 2: Fetching Customer Profiles for Contextual Support
Once a support ticket is created, the workflow moves beyond simply acknowledging the issue; it transitions into understanding the person behind the problem. The second critical step in an efficient escalation workflow is Fetching Customer Profiles.
In a modern support ecosystem, a ticket shouldn't exist in a vacuum. Automated retrieval of customer data allows the system to pull vital context-such as subscription tier, lifetime value, previous interaction history, and account seniority-directly into the ticket metadata. By enriching the ticket with this information, the system provides agents with immediate contextual support. This means a high-value enterprise client is instantly distinguishable from a free-tier user, allowing the workflow to apply the correct urgency and personalized touch from the very first moment of engagement.
Step 3: Determining Urgency through Priority Score Calculation
Once a ticket is created and the customer profile is retrieved, the system moves beyond simple manual sorting to a data-driven approach. The core of an efficient escalation engine lies in the Calculate Priority Score step. Instead of relying solely on a user's subjective high priority label, the workflow applies a standardized formula to determine the true urgency of the request.
This calculation aggregates several key variables: the customer's tier (e.g., VIP vs. Standard), the specific product impact (e.g., system outage vs. feature request), and the current time elapsed since the initial submission. By quantifying these factors into a single numerical score, the workflow eliminates human bias and ensures that critical issues rise to the top of the queue automatically. This precision is what allows the subsequent steps-such as assigning a Tier 1 agent or checking SLA thresholds-to function with high accuracy, ensuring that high-stakes tickets are never buried under routine inquiries.
Phase 2: Initial Response and Tier 1 Handling
Once a support ticket is successfully created, the workflow enters the critical phase of initial assessment and preliminary handling. The process begins with the system automatically updating the ticket status to New and performing a fetch of the customer profile. By pulling historical data, such as subscription level and previous interactions, the system can immediately calculate a priority score based on the customer's importance and the urgency of the reported issue.
With this data in hand, the system proceeds to assign a Tier 1 Agent to the ticket, ensuring the request is placed in the queue of the most available frontline specialist. However, the workflow does not stop at simple assignment; it simultaneously performs a check of the SLA threshold. This automated check ensures that the predefined service level agreements are visible to the agent from the moment the ticket is opened, setting the stage for proactive management. This phase is designed to resolve standard queries rapidly, ensuring that Tier 1 resources are used efficiently and that high-priority issues are identified before they can breach their time limits.
Step 4: Assigning Tier 1 Agents and Managing Ticket Status
Once a support ticket is created and its priority score has been calculated, the workflow moves into the active management phase. The next critical step is to Assign a Tier 1 Agent to the case. At this stage, the system identifies an available frontline representative whose skill set aligns with the initial classification of the issue. This ensures that common, high-volume queries are handled by the primary support layer, preventing them from clogging the queues of more senior specialists.
Simultaneously, the workflow must Update Ticket Status to reflect that the ticket is now In Progress. This real-time status update is vital for maintaining visibility across the support team. By automating this transition, you eliminate manual entry errors and ensure that both the customer and the support management team have a single, accurate source of truth regarding the ticket's current lifecycle stage. This seamless handoff between creation and assignment is what prevents tickets from falling through the cracks during high-traffic periods.
Step 5: Monitoring SLA Thresholds to Prevent Breaches
Once a ticket has been assigned to a Tier 1 agent, the workflow moves into a critical phase: Checking the SLA (Service Level Agreement) Threshold. Monitoring these thresholds is the heartbeat of an effective escalation process; it ensures that no customer request sits idle for too long.
In this step, the system continuously compares the time elapsed since the ticket's creation against the predefined resolution deadlines agreed upon with the customer. This isn't just about tracking time; it is about proactive prevention. By implementing automated monitoring, the system can identify tickets that are approaching their breach point before the deadline actually passes.
Effective SLA monitoring serves as an early warning system. If the system detects that a ticket is nearing its limit without progress, it triggers the next stage of the workflow: the creation of an Escalation Task. By automating this check, you move away from a reactive firefighting mode and toward a proactive service model, ensuring that your team addresses high-risk tickets with the urgency they require before the customer ever feels the impact of a delay.
Phase 3: The Escalation Trigger and Notification Chain
Once a ticket has surpassed its initial handling window, the workflow transitions from standard troubleshooting to the critical Escalation Trigger and Notification Chain. This phase is designed to ensure that no high-priority issue falls through the cracks when a Tier 1 agent is unable to resolve a query within the established SLA Threshold.
The process begins with the automated Creation of an Escalation Task, which officially moves the ticket into a specialized queue. To maintain transparency and manage customer expectations, the system immediately triggers a step to Notify the Customer of the Escalation, providing them with reassurance that their issue is being prioritized.
Simultaneously, the internal communication loop intensifies. An automated Alert to the Support Manager is dispatched to provide oversight, while, in more critical scenarios, the workflow will Alert the On-Call Engineer to ensure technical expertise is applied immediately. To ensure accountability and continuous improvement, the system performs an Update to the Escalation Log, documenting every movement and timestamp. This stage is not just about fixing the immediate problem; it is about creating a traceable audit trail that feeds into the broader operational intelligence of the support team.
Step 6: Creating Escalation Tasks and Alerting Support Managers
Once a ticket exceeds its predefined SLA threshold, the workflow transitions from standard troubleshooting to active crisis management. This phase is triggered by the automated creation of an Escalation Task, which moves the issue out of the general queue and into a high-priority track. This task serves as a dedicated record of the breach, ensuring that the urgency is documented and that the necessary resources are being mobilized to prevent further delays.
Simultaneously, the system triggers an Alert to the Support Manager. This is a critical communication bridge designed to eliminate visibility gaps. Instead of waiting for a manual check, the manager is notified in real-time, allowing them to oversee the resource reallocation and provide necessary guidance. By automating this alert, the workflow ensures that leadership is never blindsided by mounting delays, transforming the escalation process from a reactive struggle into a structured, managed response.
Step 7: Notifying Customers to Maintain Transparency
Effective communication is the cornerstone of customer trust. When a ticket is escalated, the transition from a standard support queue to a specialized tier can often feel like a black hole to a frustrated user. To prevent this anxiety, the Notify Customer of Escalation step is critical.
Automating this notification ensures that the customer is immediately informed that their issue has been recognized as high-priority and is being handled by a more senior specialist. A well-timed, automated email or in-app alert does more than just provide information; it demonstrates accountability. By clearly stating that their case is being escalated and providing a new point of reference, you reduce the need for the customer to follow up manually, thereby decreasing status check inquiries and allowing your support team to focus on actual resolution rather than repetitive updates. Transparency during the escalation process transforms a potentially negative experience into a demonstration of your commitment to excellence.
Step 8: Deploying On-Call Engineers for Critical Issues
When a support ticket bypasses standard escalation tiers and hits a critical threshold, the workflow moves beyond standard support personnel and triggers the Alert On-Call Engineer protocol. At this stage, the issue has been identified as a high-priority incident that requires deep technical expertise or immediate infrastructure intervention.
The deployment of an on-call engineer is a precise, automated transition designed to minimize downtime. Once the system detects that the SLA threshold has been breached and Tier 1 and Tier 2 interventions have been exhausted, the workflow automatically pages the designated engineer via integrated alerting tools (such as PagerDuty or Opsgenie). This step ensures that the human element of the escalation is just as seamless as the digital one, ensuring that the most complex technical bottlenecks are addressed by the right hands without delay.
Phase 4: Post-Escalation Documentation and Process Optimization
Once an escalation has been successfully resolved, the workflow shifts from active crisis management to long-term process refinement. The final stages of the workflow-Update Escalation Log, Generate Weekly Escalation Report, and Cleanup Resolved Drafts-are critical for transforming individual troubleshooting efforts into actionable business intelligence.
The process begins by ensuring the Escalation Log is meticulously updated with a post-mortem of the incident. This log should capture not just the resolution steps, but also the root cause and any friction points encountered during the handoff between Tier 1 and the On-Call Engineer. By documenting the why and how of the escalation, your team builds a searchable knowledge base that can prevent similar issues from escalating in the future.
To move from reactive troubleshooting to proactive management, the Weekly Escalation Report serves as your primary tool for high-level oversight. This report aggregates data from all escalated tickets to identify patterns, such as recurring software bugs or specific customer segments experiencing frequent downtime. Analyzing these trends allows leadership to allocate resources effectively and prioritize product fixes that directly impact stability.
Finally, maintaining a lean and high-performance ticketing system requires regular Cleanup of Resolved Drafts. Removing clutter and archiving closed tasks ensures that your support dashboard remains focused on active, high-priority issues. This continuous cycle of documentation and cleanup ensures that your escalation workflow isn't just a way to fix problems, but a strategic engine for continuous service improvement.
Step 9: Updating Escalation Logs and Analyzing Resolution Time
Once an escalation has been triggered, the workflow moves into a critical phase of documentation and performance analysis. The process involves two key actions: Updating the Escalation Log and Calculating Average Resolution Time.
The Update Escalation Log step ensures that every transition from Tier 1 to higher-tier support is documented with precision. This log serves as the single source of truth for auditing the lifecycle of a ticket, capturing exactly when the escalation occurred, which agent was involved, and the specific reason for the handoff. Without this automated logging, teams struggle to identify patterns in recurring technical issues or gaps in initial troubleshooting.
Simultaneously, the system performs a Calculate Average Resolution Time (ART) function. By analyzing the duration between the initial ticket creation and the final resolution across all escalated cases, management gains vital insights into the efficiency of the escalation pipeline. Monitoring ART allows the organization to determine if the escalation process is accelerating or hindering progress. Together, these two steps transform raw data into actionable intelligence, allowing leadership to refine support strategies and ensure that the escalation path remains a streamlined bridge to resolution rather than a bottleneck.
Step 10: Reporting, Cleanup, and Continuous Improvement
The final stage of a robust escalation workflow extends beyond immediate resolution; it focuses on long-term operational excellence through data-driven insights and system maintenance. To ensure the workflow remains efficient, the process includes three critical concluding steps: generating weekly escalation reports, cleaning up resolved drafts, and calculating average resolution time.
By analyzing the Weekly Escalation Report, leadership can identify recurring patterns, such as specific product bugs or recurring customer pain points, that trigger frequent escalations. This transforms raw data into actionable intelligence for product and engineering teams. To maintain high-level visibility, the system also continuously calculates the Average Resolution Time (ART), providing a key performance indicator (KPI) to measure the effectiveness of the escalation path and the responsiveness of Tier 2 and Tier 3 engineers.
Finally, maintaining a lean system is essential for performance. The Cleanup of Resolved Drafts ensures that the database remains uncluttered by removing obsolete or redundant information, preventing data bloat that can slow down ticket retrieval. By combining rigorous reporting with proactive system maintenance, organizations can move from a reactive firefighting mode to a proactive culture of continuous improvement.
Resources & Links
- Zendesk: Customer Service Software: Explore industry-standard tools and best practices for managing ticket lifecycles and automated escalation workflows.
- Jira Service Management: Learn how to implement automated task creation and incident management frameworks to streamline Tier 1 to Tier 2 transitions.
- Salesforce Service Cloud: Deep dive into utilizing customer profiles and CRM data to calculate priority scores and enhance contextual support.
- PagerDuty Incident Response: A guide to managing on-call engineering rotations and automated alerting systems when SLA thresholds are breached.
- Intercom: Customer Service Platform: Discover strategies for maintaining customer transparency through real-time notifications during the escalation process.
- HubSpot Service Hub: Resources on tracking key performance indicators like Average Resolution Time (ART) and generating automated weekly reports.
Found this Article helpful?
Task Management Solution Demo
Get organized & boost productivity! ChecklistGuro simplifies task management, prioritization, & progress tracking. Achieve more, stress less, & hit your goals. Manage it all with our Work OS.
Related Articles
Paper vs ChecklistGuro in Project Management
Paper vs ChecklistGuro in Task Management

Excel vs ChecklistGuro in Logistics Management
Excel vs ChecklistGuro in Task Management
Excel vs ChecklistGuro in Dental Management
Excel vs ChecklistGuro in Hospitality Management
Excel vs ChecklistGuro in Retail Management
Excel vs ChecklistGuro in Project Management
We can do it Together
Need help with
Checklists?
Have a question? We're here to help. Please submit your inquiry, and we'll respond promptly.