Inventory Cycle Count Process for Manufacturers
Published: 03/30/2026 Updated: 03/31/2026
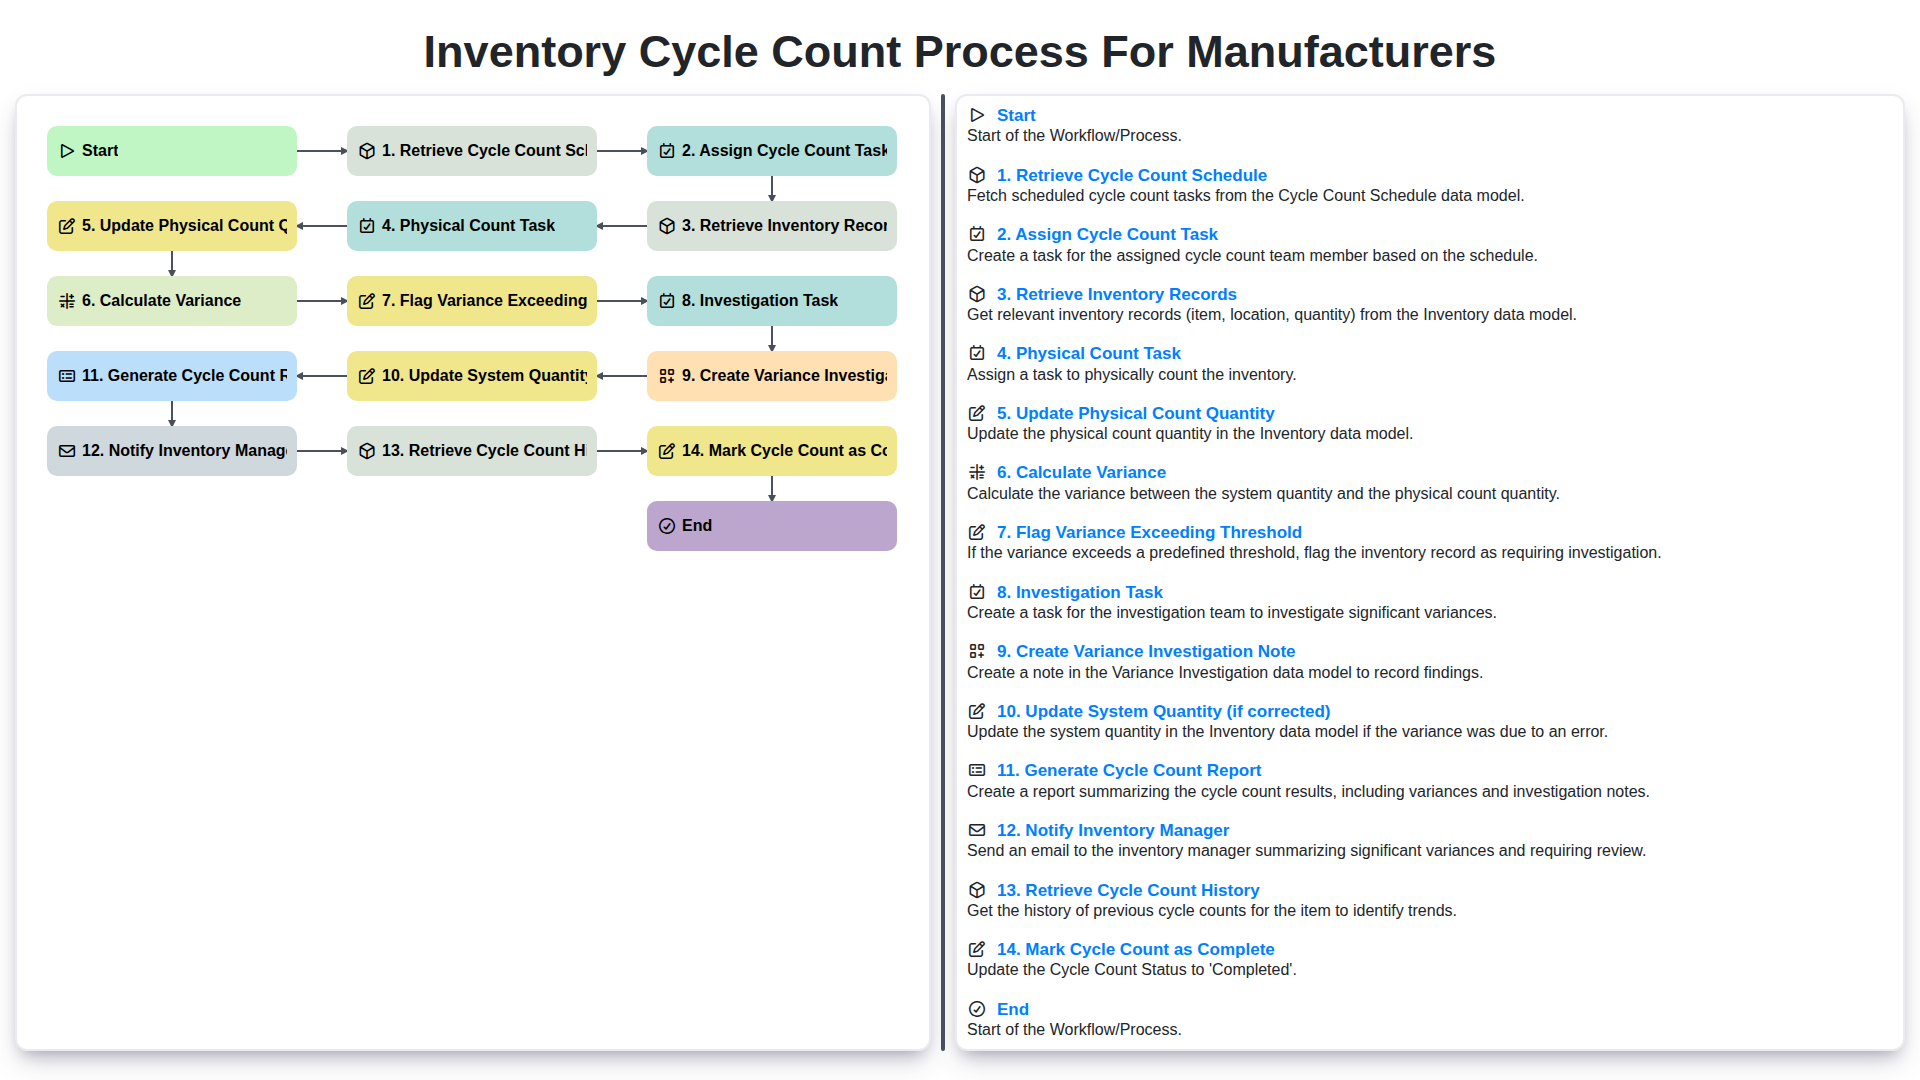
Table of Contents
- Introduction: Why Cycle Counts Matter
- 1. Retrieve Cycle Count Schedule
- 2. Assign Cycle Count Task
- 3. Retrieve Inventory Records
- 4. The Physical Count Task: Accuracy is Key
- 5. Update Physical Count Quantity in the System
- 6. Calculating Variance: Identifying Discrepancies
- 7. Flagging Variances Exceeding Thresholds
- 8. Investigation Task: Root Cause Analysis
- 9. Creating a Variance Investigation Note
- 10. Correcting and Updating System Quantity
- 11. Generating a Comprehensive Cycle Count Report
- 12. Notifying the Inventory Manager
- 13. Reviewing Cycle Count History
- Resources & Links
TLDR: Ensure accurate inventory levels and minimize discrepancies with this step-by-step cycle count workflow! It covers everything from scheduling and physical counts to variance investigation and reporting, ultimately helping you maintain a reliable stock record and improve operational efficiency.
Introduction: Why Cycle Counts Matter
Cycle counts are a cornerstone of robust inventory management for manufacturers. Unlike a full physical inventory, which is disruptive and time-consuming, cycle counts involve regularly counting a small subset of your inventory. This frequent, focused approach offers significant advantages. Accurate inventory data directly impacts production planning, order fulfillment, and ultimately, customer satisfaction. Without reliable data, you risk stockouts, excess inventory, increased carrying costs, and potential production delays. Cycle counts help identify discrepancies between recorded and actual quantities, revealing potential issues like inaccurate receiving, picking errors, theft, or damage. By proactively addressing these issues, manufacturers can improve inventory accuracy, optimize processes, and maintain a competitive edge.
1. Retrieve Cycle Count Schedule
The cycle count process begins with retrieving the scheduled cycle count tasks. This isn't a random selection; it's a carefully planned schedule designed to ensure comprehensive inventory coverage over time. The system (typically an ERP or WMS) will generate this schedule based on factors like item velocity, historical accuracy, value, and criticality to production.
This retrieval step involves accessing the system and reviewing the assigned cycle count dates and items. Understanding why an item is on the schedule (e.g., high value, frequent movement, past discrepancies) can be helpful for the counter, allowing them to be extra diligent. The schedule will typically include item numbers, locations, and any specific instructions related to the count. Successfully retrieving this schedule is the crucial first step to a reliable cycle counting program.
2. Assign Cycle Count Task
Once the cycle count schedule is retrieved, the next crucial step is assigning the actual counting tasks to your inventory personnel. This isn't just about randomly picking someone; a well-planned assignment process ensures efficiency and accuracy.
Considerations for Task Assignment:
- Skill Level: Assign more complex items or those requiring specific expertise to experienced counters.
- Location: Group tasks by location within the warehouse or production area to minimize travel time and improve efficiency. Someone familiar with a specific area will likely be more accurate.
- Workload Balancing: Distribute the tasks evenly amongst available personnel, preventing bottlenecks and ensuring a manageable workload for each counter.
- Task Prioritization: If certain items are deemed critical (e.g., raw materials for ongoing production), prioritize their cycle counts.
- Mobile Device Integration: Ideally, use a mobile device or scanner to assign tasks digitally. This eliminates paperwork, provides real-time visibility into task status, and allows for immediate updates if adjustments are needed.
Documentation is Key: Record who is assigned to which cycle count task and the scheduled completion time. This ensures accountability and provides a clear audit trail. Your inventory management system should facilitate this process, providing a record of assignments and associated details.
3. Retrieve Inventory Records
Once a cycle count task is assigned, the next step is to retrieve the relevant inventory records. This isn't just pulling up any record; it's crucial to access the most accurate and detailed information available. This typically involves querying the ERP or inventory management system using the item number, location, and lot number (if applicable) specified in the assigned task.
The retrieved records should include critical data points such as:
- System Quantity: The current recorded quantity in the system. This is the baseline against which the physical count will be compared.
- Unit of Measure (UOM): Essential for ensuring accurate counting and reconciliation. (e.g., each, case, pallet)
- Location: The specific storage location where the item is physically stored.
- Lot Number (if applicable): Crucial for traceability and identifying specific batches of inventory.
- Last Receipt Date & Quantity: Provides context for potential discrepancies.
- Last Shipment Date & Quantity: Similar to the receipt data, this offers more situational awareness.
Having this comprehensive data readily available minimizes errors and speeds up the physical counting process, setting the stage for a more accurate and efficient cycle count.
4. The Physical Count Task: Accuracy is Key
The Physical Count Task: Accuracy is Key
This is where the rubber meets the road - literally! The Physical Count Task involves the actual counting of the inventory items listed on the assigned task. It's crucial to be meticulous and follow best practices to minimize errors. Here's what to focus on:
- Verify Location: Double-check the location of the item based on the system record. Misplaced items are a common source of discrepancies.
- Count Carefully: Count slowly and deliberately. It's easy to rush and miss items, especially with fast-moving or densely packed inventory. Consider using a counting aid like a click counter, particularly for large quantities.
- Record the Count: Immediately record the physical count on your assigned task form (physical or digital). Don't rely on memory; it's easy to forget numbers.
- Utilize Best Practices: Implement techniques like counting in pairs (one counts, the other verifies) or using designated counting zones to improve accuracy.
- Document Any Issues: If you encounter any issues during the count - damaged goods, discrepancies in packaging, or unclear labeling - document them on the task form. This information will be vital for investigation later.
5. Update Physical Count Quantity in the System
Once the physical count is completed, the next crucial step is to accurately update the system with the verified quantity. This isn't just about entering a number; it's about ensuring data integrity.
Here's how to handle this update:
- Direct Input: Enter the physically counted quantity directly into the relevant inventory record within your ERP or inventory management system. Double-check the item number and location to avoid errors.
- Mobile Devices: If using mobile devices for cycle counting, the update typically happens directly through the scanning or data entry functionality within the app. This minimizes manual transcription and potential for error.
- Lot/Serial Number Tracking: If applicable (and it almost certainly is for many manufacturers), be sure to accurately record lot or serial numbers associated with the counted inventory.
- Comments/Notes: Include a brief note or comment documenting the update. This can be especially helpful for future reference or if there are discrepancies. For example: Physical count confirmed - slight dust accumulation.
- Authorization: Depending on your company's controls, the update may require authorization from a supervisor or inventory manager before it's finalized in the system.
6. Calculating Variance: Identifying Discrepancies
Once the physical count is completed and the updated quantity is entered into the system, the next crucial step is calculating the variance. This involves comparing the system's recorded quantity for each item with the physically counted quantity. The formula is simple:
Variance = System Quantity - Physical Count Quantity
A positive variance indicates a shortage (the physical count is less than the system record), while a negative variance signifies an overage (the physical count is more than the system record).
The magnitude of this variance is just as important as the sign. Manufacturing environments often establish variance thresholds - pre-determined limits for acceptable discrepancies. These thresholds are based on factors like the item's value, criticality to production, and historical accuracy rates. For example, a high-value component might have a very low variance threshold, while a less critical fastener might tolerate a larger difference.
7. Flagging Variances Exceeding Thresholds
When cycle count quantities are updated, the system automatically calculates the variance - the difference between the system's recorded quantity and the physical count. This is a critical step as it identifies discrepancies that need further attention. However, not all variances require immediate action. To streamline the process and focus efforts where they're most impactful, a variance threshold is established.
This threshold is a pre-defined percentage or quantity difference deemed acceptable. For instance, a threshold of 5% might be set. Any variance exceeding this 5% threshold triggers a flag, highlighting it for further investigation. The specific threshold amount will vary depending on the item's value, criticality, and historical accuracy. High-value or safety-critical items will generally have tighter thresholds.
The flagging system prevents bottlenecks by ensuring only significant discrepancies are escalated. This automated alert signifies the need for a dedicated investigation task, which is automatically created and assigned, ensuring no large discrepancies are overlooked.
8. Investigation Task: Root Cause Analysis
Once a variance exceeding the defined threshold is flagged, the investigation task begins. This isn't just about noting a discrepancy; it's about understanding why it happened. A thorough root cause analysis is critical to preventing future errors.
This stage typically involves:
- Gathering Information: Interviewing the counter and any relevant personnel (e.g., receiving staff, production operators). Reviewing batch records, transaction histories, and any related documentation.
- Identifying Potential Causes: Common culprits include data entry errors, picking mistakes, misidentified parts, theft, damage, or inaccuracies in the initial inventory records. Production scrap or returns not properly accounted for can also contribute.
- Documenting Findings: The investigation team should meticulously document all findings, including potential causes and supporting evidence. Photographs of damaged goods or incorrect labels can be invaluable.
- Implementing Corrective Actions: Based on the findings, corrective actions should be implemented to address the root cause. This might involve retraining staff, improving labeling practices, enhancing quality control procedures, or updating system workflows.
The goal isn't to assign blame, but to identify systemic weaknesses and implement proactive solutions to improve inventory accuracy.
9. Creating a Variance Investigation Note
Once a variance exceeding the established threshold is flagged, a detailed investigation note is crucial. This isn't just about documenting that there's a discrepancy; it's about recording why it occurred. The investigation note should be a central repository for all information related to the variance.
Here's what should be included in a robust variance investigation note:
- Cycle Count Details: Reference the specific cycle count ID, location, item number, and quantity discrepancy.
- Investigator Information: Record who performed the investigation.
- Potential Causes: Document all potential causes explored during the investigation. This might include miscounts, data entry errors, receiving discrepancies, damage, theft, or process failures. Don't be afraid to list multiple possibilities.
- Supporting Evidence: Include any supporting evidence found during the investigation. This could be photos, previous cycle count records, receiving documents, or other relevant data.
- Corrective Actions Taken (or Proposed): Detail any corrective actions taken to address the root cause of the variance. If a solution isn't immediately available, clearly outline the proposed corrective actions and the responsible party for implementation.
- Conclusion: Summarize the likely root cause of the variance based on the investigation findings. Even if the cause isn't definitively known, document what was determined at the time.
Well-documented investigation notes provide valuable data for identifying trends, improving processes, and preventing future discrepancies. They become a vital learning tool for the inventory team.
10. Correcting and Updating System Quantity
Once the investigation is complete and the root cause of the variance is understood, the next step is to correct the system quantity. This isn't a blanket adjustment; it's a carefully considered update based on findings.
Here's what happens:
- Verification: The Inventory Manager or designated authority verifies the proposed corrected quantity based on the investigation note and supporting documentation (e.g., receiving records, production orders).
- Update System Quantity: The system quantity for the affected item is updated to the verified, corrected quantity. This is usually done by a user with appropriate permissions within your ERP or inventory management system.
- Documentation: The correction is clearly documented within the system, linking it back to the original variance investigation note and the investigator's findings. This creates an audit trail for future reference.
- Impact Assessment (Optional): Depending on the severity of the variance and the item's criticality, a brief assessment of the impact on other processes (e.g., production scheduling, order fulfillment) might be necessary.
- Validation (Recommended): A spot check or subsequent cycle count in the near future can help validate the correction and ensure that the issue has been resolved.
11. Generating a Comprehensive Cycle Count Report
The cycle count process culminates in a comprehensive report, acting as a vital record of your inventory health. This report isn't just a formality; it's a powerful tool for continuous improvement. It should include key information such as:
- Item Number/SKU: Clearly identifies the item being counted.
- Location: Specifies the exact storage location within the facility.
- System Quantity: The recorded quantity in your inventory management system.
- Physical Count: The actual quantity found during the physical count.
- Variance: The difference between the system quantity and the physical count.
- Variance Status: Indicates whether the variance was within acceptable limits or flagged for investigation.
- Investigator/Resolver: Identifies the personnel involved in investigating and resolving the variance (if applicable).
- Resolution Notes: A brief description of any corrective actions taken.
- Date & Time of Count: Essential for tracking trends and identifying patterns.
- Cycle Count Team Members: (Optional) Useful for accountability and training purposes.
Regularly reviewing this report helps identify persistent discrepancies, highlight areas of process weakness (like inaccurate receiving or picking), and ultimately improve inventory accuracy. The data also feeds into predictive analytics, helping anticipate potential stockouts or overages.
12. Notifying the Inventory Manager
Once a cycle count is nearing completion, and especially if any variances have been flagged, it's crucial to notify the Inventory Manager. This notification doesn't necessarily require a lengthy explanation at this stage - the goal is to alert them to potential issues requiring their attention.
The notification should include:
- Part Number/SKU: The affected item.
- Location: Where the cycle count was performed.
- Variance Status: Whether a variance was flagged and, if so, its general magnitude (e.g., Significant Variance Detected).
- Cycle Count ID/Reference Number: For easy tracking and access to the detailed record.
This can be automated through the system or sent manually via email or messaging platform. The Inventory Manager can then prioritize investigations based on the severity of the variance and the criticality of the affected item. This proactive notification ensures timely intervention and prevents potential disruptions to production or order fulfillment.
13. Reviewing Cycle Count History
Understanding your cycle count performance over time is crucial for continuous improvement. Regularly reviewing cycle count history provides valuable insights into the accuracy of your inventory records, identifies recurring issues, and helps refine your processes.
Here's what you should look for when reviewing cycle count history:
- Trend Analysis: Are variances consistently high in specific locations or for certain items? This could indicate problems with storage, handling, or data entry.
- Frequency of Variances: Has the frequency of variances increased or decreased over time? This can reflect the effectiveness of process changes or training.
- Variance Magnitude: Are variances generally small and manageable, or are they consistently large, suggesting a systemic issue?
- Investigation Trends: Are certain types of errors frequently requiring investigation? This points to areas needing further training or process adjustments.
- Cycle Count Team Performance: Analyze the performance of individual cycle counters or teams - are there consistent differences in accuracy? This might highlight a need for additional training or reassignment of tasks.
By diligently reviewing your cycle count history, you can identify opportunities to enhance accuracy, minimize discrepancies, and improve the overall efficiency of your inventory management system. Regularly scheduled reviews (e.g., monthly or quarterly) will provide a clear picture of progress and areas needing focused attention.
Resources & Links
- APICS : The Association for Supply Chain Management (APICS) offers resources, certifications, and education related to inventory management and cycle counting. A great source for industry best practices.
- ISO (International Organization for Standardization) : While not solely focused on cycle counts, ISO standards (like ISO 9001) emphasize quality management, which includes accurate inventory records. Understanding ISO can inform your process design.
- The Balance Small Business - Cycle Counting : Provides a clear, accessible explanation of cycle counting, geared towards smaller manufacturers, but with broadly applicable concepts.
- Lean Enterprise Institute : Lean principles emphasize continuous improvement. Cycle counting fits well within a Lean environment; this site provides resources on Lean methodologies.
- Supply Chain 24/7 : A news and information source for supply chain professionals. Search the site for articles related to inventory control and cycle counting techniques.
- Infor : A company specializing in industry-specific ERP and inventory management software. Offers whitepapers and blog posts discussing best practices. (While promotional, offers relevant information).
- Microsoft Dynamics 365 - Inventory Management : Like Infor, this showcases inventory management solutions. Provides insights into how modern systems can automate and streamline cycle counting processes. (Potentially promotional).
- NIST (National Institute of Standards and Technology) : While broader than cycle counting, NIST provides resources on measurement accuracy and traceability, critical for ensuring the reliability of physical counts.
- Quality America : Provides calibration and metrology services. Accurate counting equipment is vital for cycle counts - this resource can help ensure that equipment reliability.
- Gartner : A research and advisory company that provides insights into supply chain and inventory management technologies and strategies. (May require a paid subscription for detailed reports).
Frequently Asked Questions
What is inventory cycle counting in a manufacturing context?
Inventory cycle counting is a method of auditing inventory by counting a small subset of items on a rotating schedule, rather than performing a full physical inventory count all at once. In manufacturing, this ensures that raw materials, WIP, and finished goods are accurately recorded without halting production.
How does cycle counting differ from a full physical inventory count?
A physical inventory count requires stopping all operations to count every item in the facility, which can be disruptive. Cycle counting is an ongoing process that occurs during normal working hours, focusing on specific categories or high-value items, leading to less operational downtime.
What are the primary benefits of implementing a cycle count process for manufacturers?
The main benefits include improved inventory accuracy, reduced discrepancies in production schedules, enhanced loss prevention, better warehouse organization, and the ability to identify and correct root causes of inventory shrinkage in real-time.
What is the difference between ABC analysis and cycle counting?
ABC analysis is a technique used to categorize inventory based on importance or value (A-items are high value, C-items are low value). Cycle counting uses this analysis to determine frequency; for example, 'A' items are counted more frequently than 'C' items.
What are the most common causes of inventory discrepancies found during cycle counts?
Common causes include data entry errors, theft or shrinkage, unrecorded scrap/waste, improper receiving procedures, misplacement of items within the warehouse, and errors in the production movement of work-in-progress (WIP) materials.
How often should a manufacturer perform cycle counts?
The frequency depends on the ABC classification of the items. High-value 'A' items may be counted monthly, 'B' items quarterly, and 'C' items semi-annually or annually, ensuring that the most critical stock is always verified.
Found this Article helpful?
Manufacturing Management Solution Demo
Stop chasing paperwork and wrestling with disconnected systems! Our solution brings clarity and control to your production process. From standard operating procedures (SOPs) and equipment maintenance to quality control and inventory tracking, we simplify every step.
Related Articles
Kaizen Checklist Template: Your Path to Continuous Improvement

Machine Safety Audit Checklist: Your Guide to a Safer Manufacturing Workplace
Mastering Supplier Performance: Your Free Supplier Scorecard Checklist Template
Your Ultimate RCM Checklist Template: A Step-by-Step Guide

LPA Checklist Template: Your Guide to Layered Process Audits

Your Ultimate Lockout/Tagout (LOTO) Checklist Template

Your Ultimate FSC 22000 Checklist Template
Quality Control Inspection Checklist Template: Prevent Defects & Improve Manufacturing Processes
We can do it Together
Need help with
Checklists?
Have a question? We're here to help. Please submit your inquiry, and we'll respond promptly.