Tooling Management Workflow for Manufacturing: A Step-by-Step Guide
Published: 03/30/2026 Updated: 03/31/2026
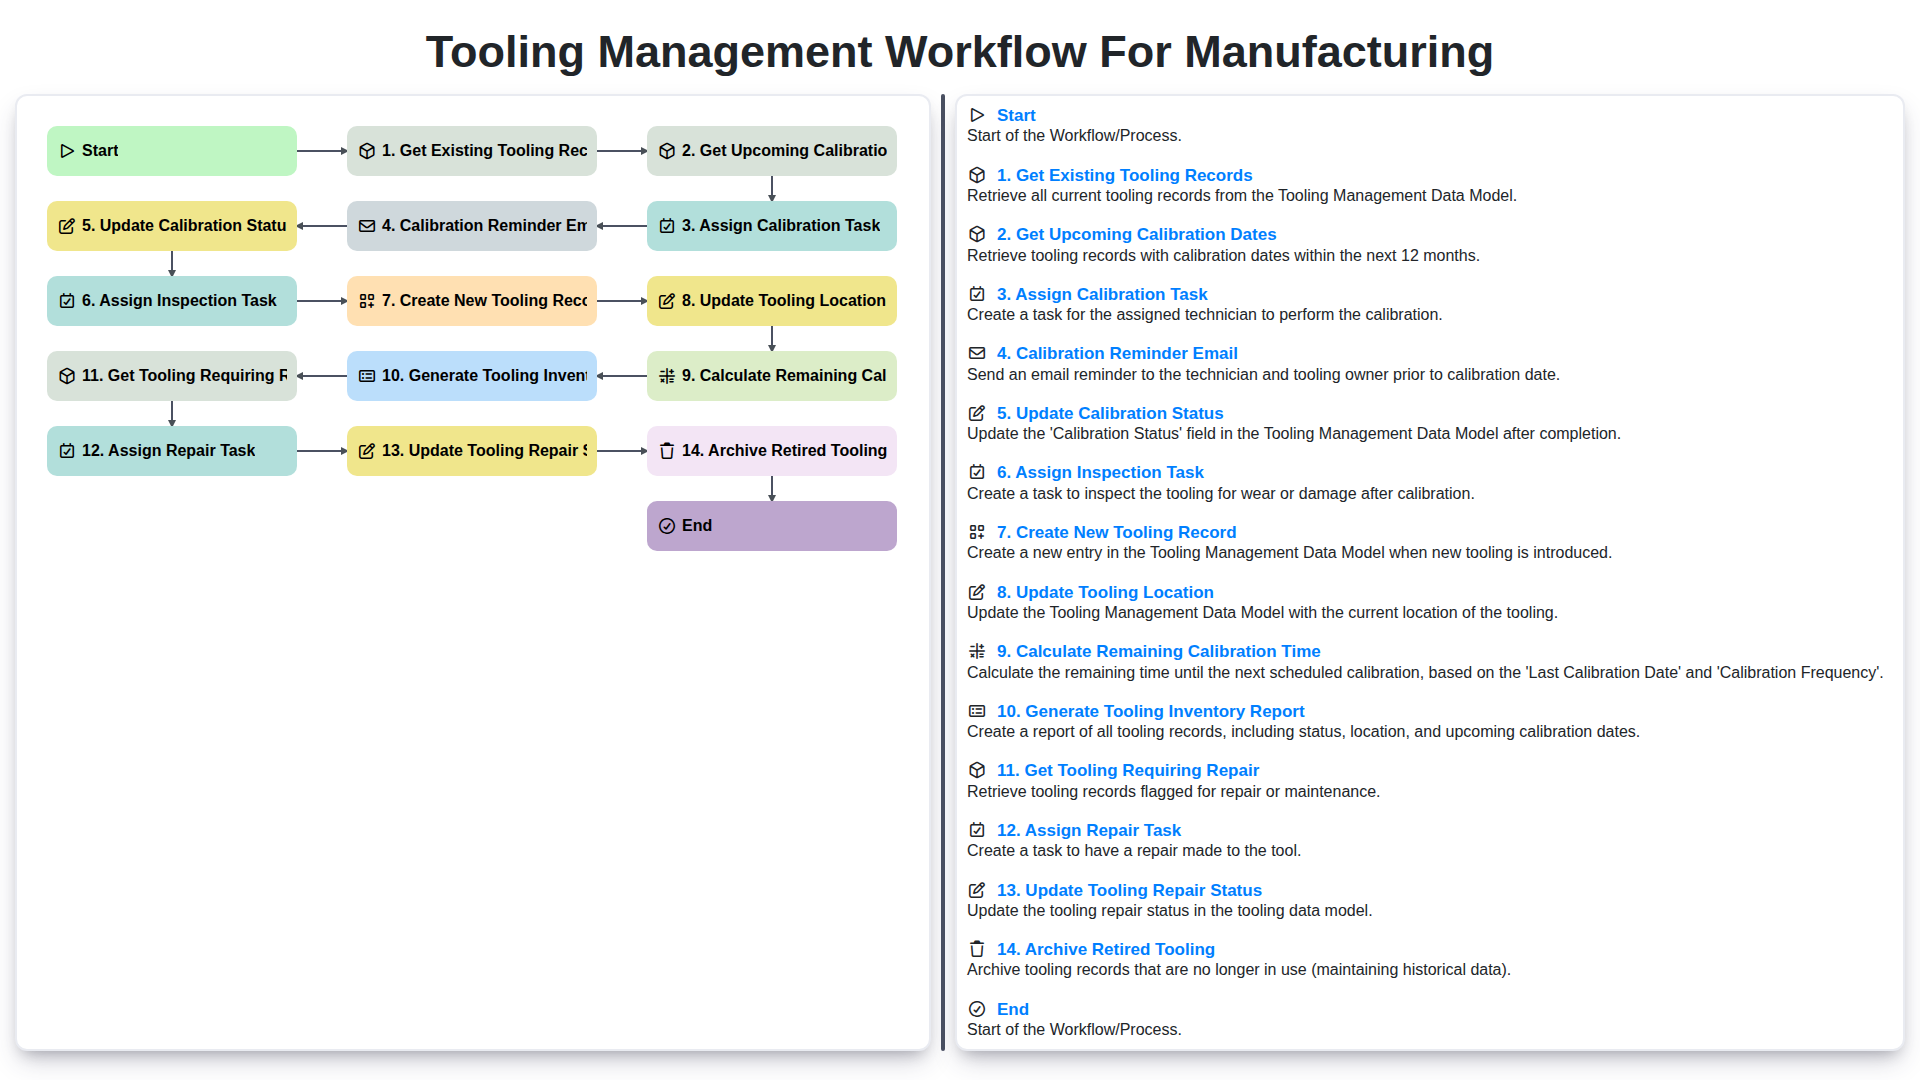
Table of Contents
- Introduction: Why a Tooling Management Workflow Matters
- 1. Get Existing Tooling Records: Establishing a Baseline
- 2. Upcoming Calibration Dates: Proactive Maintenance
- 3. Assign Calibration Task: Distributing Responsibility
- 4. Calibration Reminder Email: Staying on Track
- 5. Update Calibration Status: Recording Results
- 6. Calculate Remaining Calibration Time: Predicting Future Needs
- 7. Assign Inspection Task: Ensuring Continued Performance
- 8. Create New Tooling Record: Onboarding New Assets
- 9. Update Tooling Location: Maintaining Visibility
- 10. Get Tooling Requiring Repair: Identifying Issues
- 11. Assign Repair Task: Addressing Deficiencies
- 12. Update Tooling Repair Status: Tracking Progress
- 13. Archive Retired Tooling: Efficient Data Management
- Resources & Links
TLDR: Keep your manufacturing tooling organized and compliant with this step-by-step workflow! It covers everything from tracking existing tools, scheduling calibrations & inspections, managing repairs, and archiving retired tooling - ensuring optimal performance, preventing downtime, and maintaining accurate records for audits.
Introduction: Why a Tooling Management Workflow Matters
In manufacturing, tooling-molds, dies, jigs, fixtures, and specialized tools-is the backbone of your production process. It's a significant capital investment, and downtime due to poorly maintained or misplaced tooling can be crippling. A robust tooling management workflow isn't just a nice-to-have; it's a critical necessity for operational efficiency, cost control, and product quality.
Without a structured workflow, you risk missed calibration deadlines, unexpected breakdowns, lost tooling, and ultimately, production delays. This can lead to increased costs, frustrated employees, and potentially, dissatisfied customers. A well-defined process ensures tooling is tracked, maintained, and readily available when needed, minimizing disruptions and maximizing the return on your tooling investment. This blog post will outline a comprehensive tooling management workflow, detailing each step to help you optimize your operations and ensure your tooling remains in peak condition.
1. Get Existing Tooling Records: Establishing a Baseline
Before any proactive tooling management can begin, you need a clear picture of what you already have. This starts with gathering existing tooling records. These records aren't always centralized - they might reside in spreadsheets, paper files, or legacy systems. The first step is to consolidate this information into a single, accessible location.
What should these records contain? Ideally, each record should include:
- Tooling Identification: A unique identifier for each tool (part number, serial number, descriptive name)
- Tooling Type: Categorization of the tool (e.g., die, mold, jig, fixture)
- Manufacturer: The company that created the tooling.
- Date of Purchase/Creation: When the tooling was acquired.
- Material: The material the tooling is made from.
- Initial Cost: The original investment in the tooling.
- Current Location: Where the tooling is physically located within the facility.
- Associated Equipment: If applicable, which machine or process the tooling is associated with.
- Calibration/Inspection History: A log of past calibrations and inspections.
This initial data collection can be time-consuming, but it's the foundation for all subsequent tooling management activities. Without a comprehensive baseline, you're operating in the dark, potentially missing critical maintenance needs and increasing the risk of unplanned downtime. Consider using data extraction tools to streamline the process if dealing with large volumes of existing records.
2. Upcoming Calibration Dates: Proactive Maintenance
Knowing precisely when your tooling requires calibration is paramount for consistent product quality and preventing costly downtime. Regularly scheduled calibration ensures your tooling operates within specified tolerances, maintaining accuracy and extending its lifespan.
Our workflow utilizes a dedicated system to automatically retrieve upcoming calibration dates from existing tooling records. This goes beyond a simple calendar reminder; it's integrated directly into the tooling's digital record. This feature provides several key benefits:
- Early Visibility: Identify calibration needs well in advance, allowing ample time to schedule resources and minimize disruptions to production.
- Reduced Risk of Failure: Proactive calibration dramatically lowers the chance of tooling malfunction during critical production runs.
- Compliance Assurance: Calibration records are vital for regulatory compliance and quality management systems (e.g., ISO 9001). Our system helps you maintain this documentation seamlessly.
- Automated Alerts: The system highlights tooling nearing its calibration date, ensuring no deadlines are missed.
By leveraging this functionality, you shift from reactive repairs to a proactive maintenance strategy, safeguarding your manufacturing operations.
3. Assign Calibration Task: Distributing Responsibility
Once a calibration date is identified (as detailed in the previous step), the next crucial step is assigning the actual calibration task to the appropriate personnel. This isn't just about picking someone; it's about ensuring the right expertise is applied.
Here's how we approach assigning calibration tasks:
- Skill Matrix Alignment: We maintain a skill matrix that maps employee capabilities to specific tooling types and calibration procedures. This ensures the assigned technician possesses the necessary knowledge and experience.
- Workload Balancing: The system considers current workloads to prevent overburdening individual technicians. We aim for equitable distribution, minimizing delays and maximizing efficiency.
- Automated Assignment (where possible): Depending on the tooling type and technician skillset, the system can automatically suggest or assign tasks. This reduces administrative overhead and potential for error.
- Manual Override: A designated supervisor always has the ability to manually override automated assignments, ensuring flexibility for unique or complex situations.
- Clear Task Details: The assigned task includes all pertinent information: tooling ID, required calibration procedure, due date, and any specific notes or instructions. This ensures clarity and minimizes misunderstandings.
By carefully assigning calibration tasks and providing clear instructions, we build accountability and ensure quality calibration results.
4. Calibration Reminder Email: Staying on Track
Calibration isn't just a periodic event; it's a continuous process requiring vigilance. That's where automated calibration reminder emails become indispensable. These aren't just generic notifications; they're strategic tools designed to proactively prevent downtime and maintain quality.
Our workflow incorporates automated email reminders that are triggered based on the calculated remaining calibration time. These reminders aren't sent just at the due date; they're staggered, allowing ample time for scheduling, preparation, and any necessary approvals.
Here's what a typical calibration reminder email includes:
- Clear Subject Line: Calibration Reminder: [Tooling ID] - Due in [X] Days
- Tooling Details: Includes the tooling ID, description, location, and associated work orders.
- Due Date & Remaining Time: Displays the upcoming calibration date and how much time remains before it's due.
- Responsible Party: Clearly identifies the individual responsible for scheduling and completing the calibration.
- Link to Relevant Records: Provides direct access to the tooling record within the system for easy reference and updates.
- Escalation Path: Includes contact information for escalation if the calibration isn't scheduled within a specific timeframe.
By automating this communication, we significantly reduce the risk of missed calibration dates, ensuring consistent performance and preventing costly production interruptions. This proactive approach minimizes errors and boosts overall efficiency.
5. Update Calibration Status: Recording Results
Once the calibration task is completed, meticulously documenting the results is crucial. This isn't just about ticking a box; it's about creating a verifiable record for future reference and analysis. The system should allow for easy input of calibration results, including pass/fail status, measurements taken, any deviations from expected values, and technician notes.
Ideally, this data should be linked directly to the tooling record, creating a complete history of its calibration performance. Consider incorporating a standardized format for recording results to ensure consistency and facilitate data analysis. Photos or other visual documentation of the calibration process can also be incredibly valuable, especially if anomalies are observed. This detailed record strengthens compliance, informs maintenance decisions, and provides valuable insights into tooling health over time.
6. Calculate Remaining Calibration Time: Predicting Future Needs
Knowing when your tooling needs calibration isn't just about reacting to deadlines; it's about proactive maintenance and minimizing downtime. Calculating remaining calibration time is a crucial step in ensuring consistent quality and extending the lifespan of your tooling.
Our workflow automatically calculates the time remaining until a tooling item's next calibration date. This isn't just a simple subtraction; it incorporates factors like usage patterns (if tracked) and any previously missed calibrations. The system provides clear visual cues - color-coded indicators - highlighting tooling nearing its calibration window. This allows your team to schedule calibrations strategically, avoiding last-minute rushes and potential disruptions to production.
Furthermore, this calculation is integrated with our reporting features. The tooling inventory report prominently displays remaining calibration time, enabling you to forecast resource needs and proactively allocate technicians. By understanding future calibration requirements, you can optimize scheduling, reduce the risk of unexpected downtime, and ultimately improve overall operational efficiency. We don't just tell you when it's due; we give you the foresight to prepare.
7. Assign Inspection Task: Ensuring Continued Performance
Calibration is critical, but it doesn't tell the whole story. Tooling can degrade or experience damage outside of the specified calibration intervals. To proactively identify and address these issues, a robust inspection workflow is essential.
Following a successful calibration, an inspection task should be automatically assigned. This task isn't just a formality; it's a critical assessment of the tooling's physical condition. Inspectors should be trained to look for signs of wear, cracks, corrosion, misalignment, or any other damage that could compromise performance and safety.
The tooling management system should allow for detailed inspection notes to be recorded, including photographic evidence. This documentation creates a historical record of the tooling's condition and supports informed decision-making. Furthermore, the severity of any findings should be categorized (e.g., minor, moderate, critical) to prioritize follow-up actions. The inspection task should also include a flag to indicate if a repair or replacement is recommended, and allow for easy escalation of critical issues. This ensures that potential problems are caught early, minimizing downtime and maintaining the highest quality output.
8. Create New Tooling Record: Onboarding New Assets
Introducing new tooling into your manufacturing process is an exciting step, but it's crucial to ensure proper documentation and tracking from the get-go. This Create New Tooling Record step is your onboarding process for these assets.
Here's what's involved:
- Gather Essential Information: Before anything else, compile all necessary details. This includes:
- Tooling Type: (e.g., Dies, Molds, Punches, Jigs, Fixtures)
- Manufacturer: The company that produced the tooling.
- Model Number/Part Number: Identification assigned by the manufacturer.
- Serial Number (if applicable): Unique identifier for individual tooling.
- Date of Purchase/Acquisition: Crucial for tracking age and potential lifespan.
- Initial Condition: Document any existing markings, scratches, or issues.
- Material: The material the tooling is made from.
- Associated Equipment/Machine: Which machine or process the tooling is used with.
- Cost: The original purchase price.
- Populate the Tooling Management System: Input this information into your chosen tooling management software. Ensure all fields are completed accurately and consistently.
- Assign Initial Calibration/Inspection Dates: Based on manufacturer recommendations and internal standards, schedule the first calibration and inspection tasks. These dates should be recorded within the system.
- Attach Supporting Documentation: Scan and upload relevant documents such as purchase orders, manufacturer's specifications, and any warranty information. This creates a centralized, digital record.
- Designate Responsible Personnel: Assign individuals responsible for ongoing maintenance, inspection, and calibration of the new tooling.
Proper tooling record creation sets the foundation for accurate tracking and preventative maintenance. Skipping this step can lead to inaccuracies, missed deadlines, and ultimately, costly downtime.
9. Update Tooling Location: Maintaining Visibility
Knowing exactly where your tooling resides is crucial for efficient operations and preventing costly delays. This step focuses on proactively updating the tooling's location within the system. Whether it's moved to a new work center, transferred to a different department, or temporarily placed in storage, accurate location data ensures anyone who needs it can quickly find it.
This isn't a "set it and forget it" activity. Regularly verifying and updating tooling locations, especially when shifts change or projects require tool movement, prevents confusion and downtime. Our workflow encourages users to update the location field whenever a tooling item is moved, creating a continuously accurate inventory view. This includes documenting the reason for the relocation, providing valuable context for future reference and process improvement analysis. Consider integrating barcode scanning or RFID technology for automated location tracking to minimize manual entry errors and maximize efficiency.
10. Get Tooling Requiring Repair: Identifying Issues
Tooling doesn't last forever. Wear and tear, unexpected stresses, and occasional accidents are inevitable in a manufacturing environment. Regularly identifying tooling requiring repair is crucial for maintaining production quality, preventing downtime, and extending the lifespan of your valuable tools.
This step in the workflow focuses on proactively pinpointing tooling that needs attention. We don't just wait for a tool to fail catastrophically; we look for early warning signs. This involves cross-referencing several data points:
- Calibration Records: Tools that have failed calibration checks often indicate underlying issues. A failed calibration isn't always a simple fix; it may point to wear or damage requiring repair.
- Inspection Reports: Detailed inspections, whether visual or using more sophisticated methods (NDT, etc.), can reveal cracks, erosion, corrosion, or other defects.
- Operator Feedback: Empowering operators to report concerns about tooling performance is invaluable. They are often the first to notice subtle changes or anomalies. Implementing a simple reporting system, perhaps via a digital form, can significantly improve this process.
- Usage History: Certain tools, due to their application or frequency of use, are more prone to wear. Tracking usage patterns helps prioritize inspections and repairs.
The system should flag tooling exhibiting any of these indicators, creating a prioritized repair list. This list will then feed directly into the "Assign Repair Task" step, ensuring timely action and minimizing disruption to production.
11. Assign Repair Task: Addressing Deficiencies
Once tooling is identified as requiring repair (either through calibration failure or inspection), a formal repair task needs to be initiated. This section outlines the process.
1. Task Creation & Assignment: A dedicated repair task is created within the workflow system. This task includes details like the tooling ID, a description of the identified defect, severity level (critical, major, minor), and any accompanying documentation (photos, inspection reports). The system automatically assigns this task to the appropriate personnel - typically a maintenance technician or a specialized tooling repair team. The assignment considers factors like technician skillset, current workload, and urgency of the repair.
2. Prioritization & Scheduling: The assigned technician reviews the repair details and prioritizes the task based on the severity level and impact on production. The system allows for scheduling the repair, factoring in machine downtime and production schedules to minimize disruption.
3. Documentation & Communication: The technician documents all steps taken during the repair process, including parts replaced, procedures followed, and any unexpected issues encountered. This documentation is crucial for traceability, future reference, and potential root cause analysis. The system facilitates communication between the technician, the tooling engineer, and any other relevant stakeholders through built-in messaging or notification features.
4. Repair Verification: Upon completion, the repaired tooling undergoes a verification process. This might include functional testing, inspection, and potentially a short trial run to ensure the repair was successful and the tooling is performing as expected. Results of the verification are documented within the task record.
5. Closure & Task Handover: Once verification is successful, the task is closed. The tooling record is updated to reflect the repair details, including the date of repair, parts used, and technician responsible. This completes the repair workflow and prepares the tooling for its next scheduled calibration or inspection.
12. Update Tooling Repair Status: Tracking Progress
Keeping a clear and consistent record of tooling repair progress is critical for minimizing downtime and maintaining operational efficiency. This step involves meticulously documenting each stage of the repair process, from initial fault identification to final verification and return to service.
The Update Tooling Repair Status workflow step typically includes the following:
- Detailed Notes: Document the specific repairs undertaken, including parts replaced, adjustments made, and any unexpected findings.
- Repair Personnel: Record the name and/or ID of the technician responsible for the repair.
- Repair Date: Log the date the repair was completed.
- Cost Tracking: Associate repair costs with the tooling record for budget management and future analysis.
- Verification & Testing: Note any post-repair testing or verification procedures performed to ensure the tooling meets original specifications and safety standards. Include test results if applicable.
- Return to Service Date: Record the date the tooling is officially released back into production.
- Status Flag: Update the tooling record's status to "Repaired" or similar, reflecting its readiness for use.
This information is vital not only for the immediate repair process but also for future troubleshooting, identifying recurring issues with specific tooling, and optimizing maintenance schedules. Accurate Update Tooling Repair Status entries contribute significantly to a robust and preventative tooling management program.
13. Archive Retired Tooling: Efficient Data Management
As tooling ages or becomes obsolete, it's critical to properly archive its records. Simply deleting information isn't sufficient; it can lead to compliance issues and potential loss of valuable historical data. Our workflow includes a dedicated step for archiving retired tooling.
Here's what that process entails:
- Record Preservation: All relevant data associated with the retired tooling - including design specifications, past calibration/inspection records, usage history, and any relevant notes - is preserved.
- Data Migration: This data is moved from the active tooling management system to a secure, read-only archive. This prevents accidental modification or deletion.
- Metadata Tagging: The archived tooling records are meticulously tagged with clear identifiers such as "Retired," "Obsolete," and the date of retirement. This ensures easy searchability and categorization.
- Retention Policy Compliance: The archiving process adheres to your organization's data retention policies and regulatory requirements, guaranteeing legal compliance and minimizing liability.
- Limited Access: Access to archived tooling records is restricted to authorized personnel only, maintaining data security and integrity.
Proper tooling archival isn't just about clearing out old data; it's about responsible data management and maintaining a complete and auditable tooling history.
Resources & Links
- National Institute of Standards and Technology (NIST) : NIST provides standards, measurements, and research to advance U.S. innovation and industrial competitiveness. Relevant for tooling calibration and quality standards.
- International Organization for Standardization (ISO) : Provides a wide range of international standards, including those related to quality management and maintenance (e.g., ISO 9001, ISO 13485). Provides a framework for tooling management and traceability.
- American Society for Quality (ASQ) : ASQ is a global leader in quality. Offers training, certifications, and resources related to quality management, including maintenance and tooling.
- Reliabilityinfo.com (The Maintenance Resource) : A website offering a wealth of information and resources specifically focused on maintenance best practices, including preventive maintenance programs which are vital for tooling.
- Computerized Maintenance Management System (CMMS) Vendors : A portal to several CMMS vendors. CMMS software can greatly assist in automating and managing the tooling workflow described in the post.
- MRO Software : Offers tooling management software and related services. Provides a practical example of a software solution to aid the tooling workflow.
- Society of Automotive Engineers (SAE) : Offers standards and publications relevant to tooling, particularly in the automotive and aerospace industries. Relevant for precise and regulated tooling applications.
- Quality Magazine : An online publication offering articles, news, and resources on quality management, including topics related to tooling and maintenance.
- Association for Supply Chain Management (APICS) : While focused on supply chain, APICS resources on inventory management and traceability can be valuable for managing tooling assets.
- PTC (Product Lifecycle Management) : PTC offers PLM software which can be utilized for a comprehensive tool management system, connecting tooling records with product lifecycles.
Frequently Asked Questions
What is a tooling management workflow in manufacturing?
A tooling management workflow is a structured, step-by-step process used to track, maintain, and manage the lifecycle of manufacturing tools, including procurement, usage, maintenance, and disposal, to ensure production efficiency and minimize downtime.
Why is implementing a standardized tooling workflow important?
Standardization helps reduce production delays caused by tool failure, lowers operational costs by preventing premature tool replacement, improves tool lifespan through scheduled maintenance, and enhances overall inventory accuracy.
What are the key stages of a typical tooling management lifecycle?
The key stages typically include tool procurement and receiving, inventory registration, usage tracking, preventative maintenance scheduling, tool repair/refurbishment, and final decommissioning or disposal.
How can manufacturers reduce downtime through better tool management?
Manufacturers can reduce downtime by implementing predictive maintenance, ensuring critical spare tools are always in stock, and using real-time tracking to prevent unexpected tool breakage during production cycles.
What technologies can be used to automate tooling management?
Common technologies include RFID tags for real-time tracking, IoT sensors for monitoring tool wear, and specialized Manufacturing Execution Systems (MES) or Enterprise Resource Planning (ERP) software to digitize the entire workflow.
Found this Article helpful?
Manufacturing Management Solution Demo
Stop chasing paperwork and wrestling with disconnected systems! Our solution brings clarity and control to your production process. From standard operating procedures (SOPs) and equipment maintenance to quality control and inventory tracking, we simplify every step.
Related Articles
Kaizen Checklist Template: Your Path to Continuous Improvement

Machine Safety Audit Checklist: Your Guide to a Safer Manufacturing Workplace
Mastering Supplier Performance: Your Free Supplier Scorecard Checklist Template
Your Ultimate RCM Checklist Template: A Step-by-Step Guide

LPA Checklist Template: Your Guide to Layered Process Audits

Your Ultimate Lockout/Tagout (LOTO) Checklist Template

Your Ultimate FSC 22000 Checklist Template
Quality Control Inspection Checklist Template: Prevent Defects & Improve Manufacturing Processes
We can do it Together
Need help with
Checklists?
Have a question? We're here to help. Please submit your inquiry, and we'll respond promptly.