A Step-by-Step Guide to the Software Development Sprint Planning Process
Published: 06/18/2026 Updated: 06/19/2026
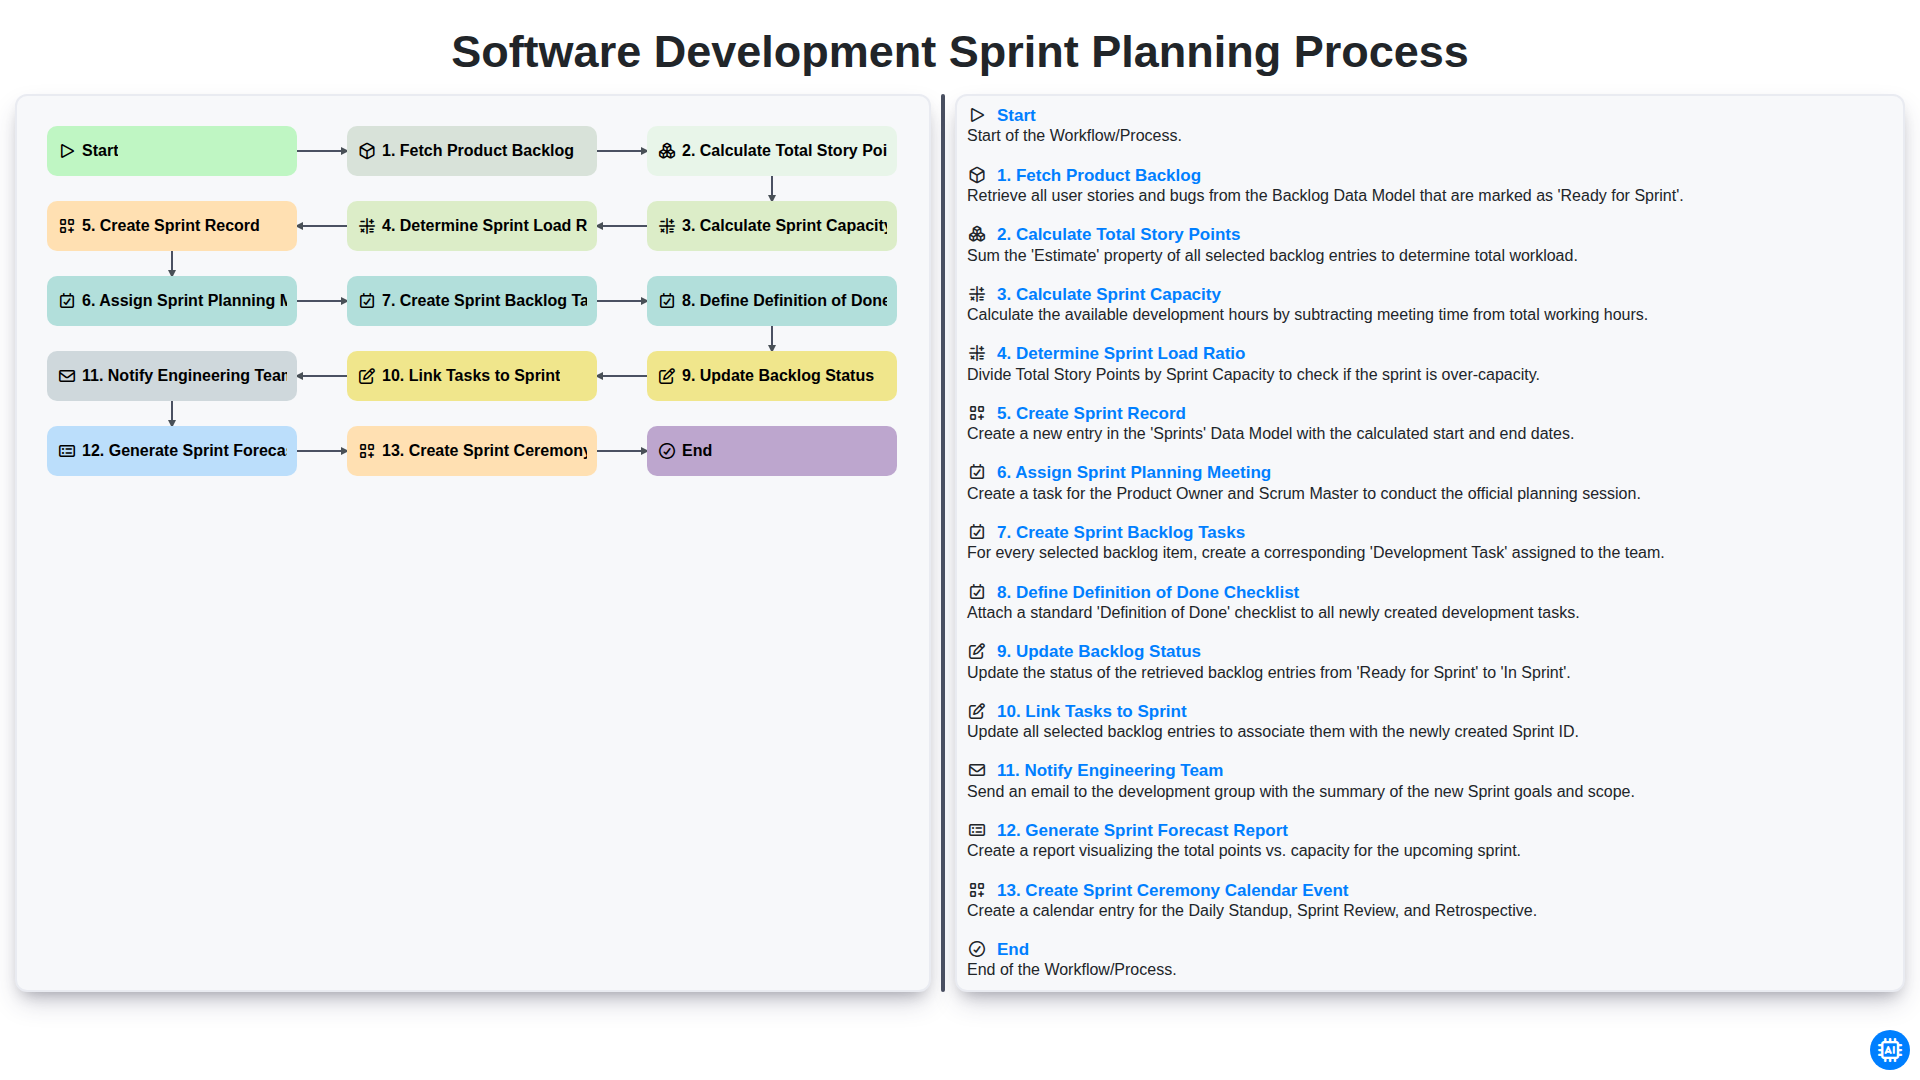
Table of Contents
- Introduction to Effective Sprint Planning
- Step 1: Fetching and Reviewing the Product Backlog
- Step 2: Calculating Total Story Points for the Upcoming Sprint
- Step 3: Assessing Available Sprint Capacity
- Step 4: Determining the Optimal Sprint Load Ratio
- Step 5: Initializing the Sprint Record
- Step 6: Scheduling the Sprint Planning Meeting
- Step 7: Breaking Down the Sprint Backlog into Actionable Tasks
- Step 8: Establishing a Clear Definition of Done (DoD) Checklist
- Step 9: Updating Backlog Status and Task Alignment
- Step 10: Linking Individual Tasks to the Active Sprint
- Step 11: Communicating the Plan to the Engineering Team
- Step 12: Generating the Sprint Forecast Report
- Step 13: Finalizing the Sprint Ceremony Calendar
- Resources & Links
TLDR: Learn how to streamline your Agile lifecycle with our comprehensive guide to the Software Development Sprint Planning workflow. This post breaks down every essential step-from fetching the product backlog and calculating capacity to defining the 'Definition of Done' and notifying your team-to help you execute efficient, predictable, and high-quality sprints every time.
Introduction to Effective Sprint Planning
Sprint planning is the heartbeat of the Agile methodology, serving as the critical bridge between a long-term product vision and the immediate, actionable work of the engineering team. It is the moment where the high-level roadmap meets the reality of technical execution. Without a structured approach to planning, development cycles often succumb to scope creep, missed deadlines, and developer burnout.
Effective sprint planning is not merely about picking tasks from a list; it is a meticulous, data-driven process of balancing ambition with capability. It requires a systematic workflow that transforms a raw product backlog into a realistic, committed sprint backlog. By following a repeatable framework-ranging from calculating team capacity and determining load ratios to defining clear Definitions of Done-teams can move away from reactive firefighting and toward a predictable, high-velocity delivery cadence. In this guide, we will break down the essential steps required to master this workflow and ensure every sprint is set up for success.
Step 1: Fetching and Reviewing the Product Backlog
The foundation of a successful sprint lies in the quality of the requirements you bring to the table. The process begins with Fetching the Product Backlog, which involves gathering all the prioritized user stories, features, and bug fixes that have been curated by the Product Owner.
During this initial phase, the goal is to ensure that the items pulled into the planning session are Ready. This means reviewing each item to ensure it meets the team's acceptance criteria and contains enough detail for the engineering team to understand the scope. By systematically retrieving and reviewing the backlog, you prevent the common pitfall of starting a sprint with ambiguous tasks, thereby reducing the risk of mid-sprint blockers and unexpected discovery work.
Step 2: Calculating Total Story Points for the Upcoming Sprint
Once the product backlog has been fetched and the potential tasks are identified, the next critical step is to Calculate Total Story Points. This stage is where the abstract idea of a to-do list transforms into a measurable scope of work.
Instead of focusing on hours or days-which can be subjective and prone to human error-the team utilizes Story Points to represent the relative complexity, effort, and uncertainty of each task. By summing up the estimated points of all the items selected for the upcoming sprint, you arrive at a Total Story Point figure.
This number is vital because it serves as the baseline for your sprint's magnitude. It allows the Product Owner and the Engineering Team to see the sheer volume of work being proposed. However, this number should not be viewed in isolation; it is merely the demand side of the equation. The next step will be to compare this total against your actual team capacity to ensure the sprint is realistic and achievable.
Step 3: Assessing Available Sprint Capacity
Once you have a clear understanding of the total volume of work within your product backlog, the next critical step is to determine exactly how much work your team can realistically commit to. Calculating Sprint Capacity is not just about counting available hours; it is about evaluating the true availability of your engineering team during the upcoming iteration.
To perform an accurate capacity assessment, you must account for several variables that can impact velocity:
- Planned Time Off: Account for holidays, sick leave, and pre-approved vacations.
- Company Holidays: Ensure public holidays are subtracted from the working days available in the sprint.
- Non-Development Commitments: Factor in time dedicated to maintenance, bug fixes, or administrative meetings.
- Focus Factor: Recognize that working hours are not coding hours. No developer spends 100% of their day writing code; buffer time for context switching and cognitive breaks is essential for a realistic plan.
By calculating the net available capacity, you move away from guesswork and toward a data-driven approach. This prevents the common pitfall of over-commitment, which leads to burnout and missed deadlines, and instead builds a foundation for a sustainable, predictable development lifecycle.
Step 4: Determining the Optimal Sprint Load Ratio
Once you have calculated your total story points and assessed your team's available capacity, the next critical step is to Determine the Sprint Load Ratio. This metric acts as a safety buffer to ensure your sprint is realistic and resilient to unforeseen interruptions.
The Sprint Load Ratio is the percentage of your total capacity that you intentionally commit to the sprint backlog. Rather than planning for 100% utilization-which often leads to burnout and missed commitments-a healthy workflow typically aims for a ratio between 70% and 85%.
By leaving a deliberate gap in your capacity, you create room for:
- Unplanned Urgent Bugs: High-priority production issues that require immediate attention.
- Context Switching: The natural overhead that occurs when developers move between different tasks.
- Spikes and Research: Unforeseen technical complexities that may emerge mid-sprint.
- Operational Overhead: Time spent on code reviews, meetings, and documentation.
Calculating this ratio prevents the common pitfall of over-planning, where a single roadblock causes a domino effect of delays across the entire sprint. A well-calibrated load ratio ensures that the team maintains a steady, predictable velocity, making your sprint delivery much more reliable.
Step 5: Initializing the Sprint Record
Once the team has established the boundaries of the sprint through capacity and load calculations, the next critical step is to formalize the sprint within your project management tool. Creating the Sprint Record serves as the foundation for the entire upcoming development cycle.
This step involves officially initializing a new sprint container in your backlog management system (such as Jira, Azure DevOps, or Trello) with a clearly defined start and end date. By creating this record, you transform a collection of abstract ideas into a time-bound commitment. This action also serves as the anchor that allows you to begin grouping specific backlog items into a unified, trackable unit, ensuring that all subsequent tasks, documentation, and progress tracking are centralized within a single, organized workspace.
Step 6: Scheduling the Sprint Planning Meeting
Once the logistics of the sprint backlog are finalized, the next critical step is to move from documentation to action by Assigning the Sprint Planning Meeting. A well-structured workflow relies heavily on timely communication; therefore, simply creating a task list is not enough. You must officially designate a time and a facilitator to lead the discussion.
During this phase, the project manager or Scrum Master selects a suitable time slot that aligns with the team's availability and formally schedules the session in the team's shared calendar. This step ensures that all key stakeholders-including the Product Owner, Scrum Master, and the entire Development Team-are synchronized. By assigning this meeting early, you provide the team with the necessary lead time to review the proposed sprint backlog, ensuring that when the meeting actually begins, the team arrives prepared to commit to the upcoming workload with confidence.
Step 7: Breaking Down the Sprint Backlog into Actionable Tasks
Once the high-level goals for the sprint have been established, the next critical step is to move from abstract user stories to granular, actionable work. Creating Sprint Backlog Tasks is where the what of the sprint meets the how of the execution.
At this stage, the development team decomposes each selected user story into smaller, manageable units of work-often referred to as sub-tasks. A well-defined task should be small enough to be completed within a single day and specific enough that any engineer on the team can understand the technical requirements. This process involves identifying the specific technical steps required, such as database schema changes, API endpoint creation, UI component development, or writing unit tests.
By breaking stories down into these discrete tasks, you achieve three major benefits:
- Increased Visibility: It becomes much easier to track real-time progress throughout the sprint.
- Improved Estimation Accuracy: It is far easier to estimate a 4-hour task than a vague, multi-day user story.
- Reduced Bottlenecks: Granular tasks allow team members to identify dependencies early, preventing a situation where one person is blocked by an undefined technical hurdle.
Remember, the goal of this step isn't just to create a checklist, but to provide the roadmap that will guide the engineering team from the planning meeting to the final deployment.
Step 8: Establishing a Clear Definition of Done (DoD) Checklist
A successful sprint isn't just about completing tasks; it is about ensuring that every completed task meets a consistent standard of quality. To prevent ambiguity and scope creep during the final days of a sprint, the planning process must include the creation of a Definition of Done (DoD) checklist.
Without a predefined DoD, done becomes a subjective term. One developer might consider a task finished once the code is written, while another might believe it is only complete after unit testing and documentation are finalized. This discrepancy leads to technical debt, unexpected bugs, and failed sprint goals.
During this step, the team must collectively agree on a mandatory set of criteria that every user story must satisfy before it can be marked as complete. A robust DoD checklist typically includes items such as:
- Code Review Completed: Peer reviews have been performed and all comments addressed.
- Unit Tests Passed: All relevant automated tests are passing in the local and staging environments.
- Documentation Updated: API documentation, README files, or user manuals have been revised.
- Integration Testing: The feature has been verified to work within the larger ecosystem without breaking existing functionality.
- QA Verification: The feature has been validated against the acceptance criteria in a testing environment.
By establishing this checklist during the planning phase, you provide the engineering team with a clear roadmap for quality. It transforms done from a vague concept into a measurable, non-negotiable standard, ensuring that every increment delivered at the end of the sprint is truly production-ready.
Step 9: Updating Backlog Status and Task Alignment
Once the initial planning is complete and tasks have been structurally organized, it is critical to ensure that the source of truth-the Product Backlog-reflects the current reality of the development cycle. Updating the backlog status serves as the final synchronization point between long-term product vision and short-term execution.
This stage involves two crucial actions:
- Updating Backlog Status: As items are moved from the Ready or Refined state into the active Sprint, their status must be updated globally. This prevents ghost tasks from remaining in the backlog and ensures that stakeholders looking at the high-level roadmap see an accurate representation of what is currently being developed versus what is still awaiting refinement.
- Linking Tasks to Sprint: It is not enough to simply move a ticket; each task must be explicitly linked to the specific Sprint Record created earlier in the process. This creates a traceable lineage from the original product requirement to the active sprint backlog. Proper linking ensures that during the Sprint Review, the team can easily demonstrate how specific user stories were decomposed into technical tasks, providing full transparency into the development velocity and the complexity of the work performed.
By finalizing these updates, you eliminate ambiguity, ensuring that both Product Owners and Engineers are looking at a single, unified version of the truth.
Step 10: Linking Individual Tasks to the Active Sprint
Once the sprint backlog tasks have been meticulously created and the Definition of Done has been established, the next critical step is to link individual tasks to the active sprint. This step acts as the connective tissue between your high-level planning and your daily execution.
Simply having a list of tasks is not enough; they must be formally associated with the specific sprint container to ensure visibility and tracking. By linking these tasks, you transition them from a generic to-do state into a time-bound commitment. This integration ensures that when developers open their sprint boards, they see a clear, unified view of exactly what needs to be accomplished within the current iteration.
Crucially, this step enables accurate progress tracking. Without this explicit link, your burn-down charts, velocity calculations, and real-time progress updates will be inaccurate, making it impossible to gauge whether the team is on track to meet the sprint goal. Linking tasks effectively transforms a collection of independent items into a cohesive, actionable sprint plan.
Step 11: Communicating the Plan to the Engineering Team
Once the sprint plan is finalized, the most critical step is ensuring the entire engineering team is aligned with the new objectives. Notify Engineering Team is not just about sending an automated email; it is about ensuring transparency and shared ownership.
Effective communication prevents the sprint surprise where developers walk into a meeting unaware of the upcoming commitments. This step involves distributing the finalized sprint backlog, highlighting any high-priority stories, and flagging potential technical dependencies. By proactively communicating the plan, you allow the team to mentally prepare for the upcoming workload, ask clarifying questions, and ensure that everyone understands the goals we are striving to achieve during the upcoming iteration.
Step 12: Generating the Sprint Forecast Report
The final step in our workflow is the generation of the Sprint Forecast Report. Once all tasks are linked, capacities are calculated, and the team is notified, it is crucial to transform this raw data into actionable intelligence.
The Sprint Forecast Report serves as a single source of truth for stakeholders and the engineering team alike. Rather than just looking at a list of tasks, this report provides a high-level view of the expected velocity and the projected completion date for the current sprint goals. It synthesizes the total story points against the calculated capacity and the determined load ratio to provide a realistic expectation of what can be achieved.
By automating this report generation, you eliminate manual calculation errors and ensure that the data reflects the most recent updates made during the planning phase. This document is vital for managing stakeholder expectations and serves as the primary benchmark for conducting the Sprint Retrospective at the end of the cycle, allowing the team to compare actual output against the initial forecast to drive continuous improvement.
Step 13: Finalizing the Sprint Ceremony Calendar
The final step in our workflow involves moving from documentation to action by creating a Sprint Ceremony Calendar Event. A well-planned sprint only succeeds if the entire team is aligned on the rhythm of upcoming rituals.
Once the sprint backlog is defined and the engineering team has been notified, it is crucial to formalize the timeline. This step involves auditing the upcoming two-week (or chosen cadence) period and populating the team's shared calendar with the essential ceremonies: the Sprint Planning session, Daily Stand-ups, Sprint Review, and the Sprint Retrospective.
By automating or manually ensuring these events are blocked out immediately during the planning phase, you eliminate scheduling conflicts and ensure that meeting fatigue is minimized through consistent, predictable timing. This creates a stable heartbeat for the development cycle, allowing the team to focus entirely on execution rather than administrative coordination.
Resources & Links
- Atlassian Agile Guide : A comprehensive resource for understanding Scrum frameworks, backlog management, and sprint execution best practices.
- Scrum.org : The official home for Scrum mastery, providing deep dives into professional roles, ceremonies, and sprint planning principles.
- Agile Alliance : A global community resource for learning about Agile methodologies, including capacity planning and continuous improvement.
- Mountain Goat Software : Expert insights and tutorials specifically focused on story pointing, backlog refinement, and managing software development workflows.
- Project Management Institute (PMI) : Professional standards and resources for managing project loads, capacity, and resource allocation in technical environments.
Found this Article helpful?
Task Management Solution Demo
Get organized & boost productivity! ChecklistGuro simplifies task management, prioritization, & progress tracking. Achieve more, stress less, & hit your goals. Manage it all with our Work OS.
Related Articles

Paper vs ChecklistGuro in Project Management
Paper vs ChecklistGuro in Task Management

Excel vs ChecklistGuro in Logistics Management
Excel vs ChecklistGuro in Task Management
Excel vs ChecklistGuro in Dental Management
Excel vs ChecklistGuro in Hospitality Management
Excel vs ChecklistGuro in Retail Management
Excel vs ChecklistGuro in Project Management
We can do it Together
Need help with
Checklists?
Have a question? We're here to help. Please submit your inquiry, and we'll respond promptly.