Streamlining Construction: Your Free Operation & Functionality Checklist Template
Published: 09/01/2025 Updated: 12/13/2025
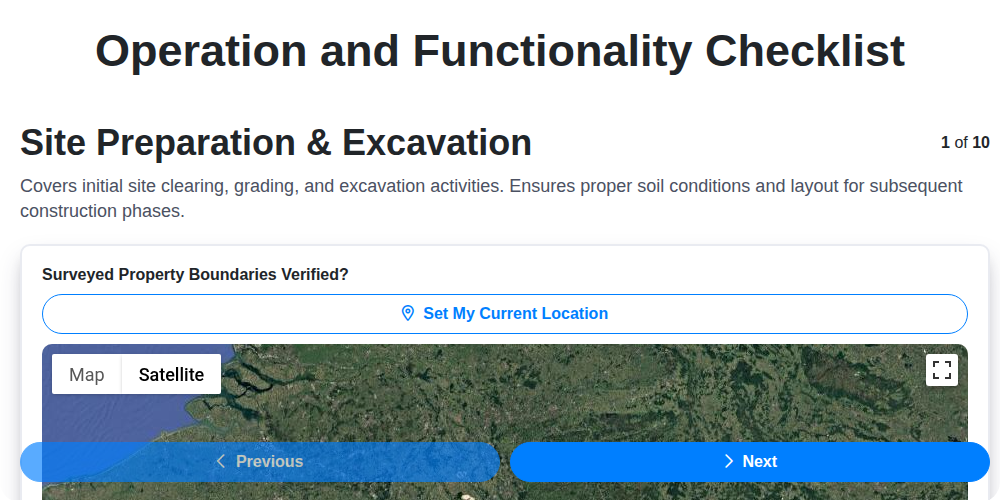
Table of Contents
- Introduction: Why a Checklist is Your Construction Lifeline
- The Cost of Skipping Checks: Common Construction Pitfalls
- Your Free Operation & Functionality Checklist Template: A Sneak Peek
- Phase 1: Site Preparation - Laying the Groundwork
- Phase 2: Foundation & Concrete - Building a Solid Base
- Phase 2.5: MEP Rough-in - Early Stage Coordination
- Phase 3: Structural Framework - Raising the Structure
- Phase 3.5: Insulation and Vapor Barrier Installation
- Phase 4: Interior Finishes - Polishing the Project
- Phase 5: Accessibility and Safety - Ensuring a Secure Environment
- Beyond the Checklist: Best Practices for Implementation
- Conclusion: Building Success, One Check at a Time
- Resources & Links
TLDR: Get organized and reduce costly errors on your construction projects with our free Operation & Functionality Checklist Template! This template guides you through key phases (from site prep to finishing touches), ensures quality control, promotes safety, and simplifies compliance. Download it now to streamline your workflow and build better!
Introduction: Why a Checklist is Your Construction Lifeline
Construction projects, by their very nature, are complex endeavors. Numerous trades, intricate designs, and a constant flow of materials converge to bring a building to life. This complexity, however, also introduces inherent risks - missed details, overlooked regulations, and potential for costly errors. Imagine navigating a ship without a map or compass; a checklist serves as your construction lifeline, providing structure, ensuring accountability, and mitigating potential pitfalls. It's more than just a to-do list; it's a proactive approach to quality control, safety compliance, and project success. A well-crafted checklist fosters clear communication, minimizes rework, and ultimately safeguards your investment in time, resources, and reputation.
The Cost of Skipping Checks: Common Construction Pitfalls
Ignoring or rushing through critical checklist items can seem like a shortcut to save time and money in the short term. However, the reality is often far more costly. We're not just talking about minor inconveniences; we've seen projects derailed by seemingly small oversights.
Consider a foundation built without proper reinforcement verification. The resulting structural instability could necessitate costly and disruptive rebuilding, potentially delaying the entire project and incurring significant legal ramifications. Or picture an MEP system installed without leak testing - the resulting water damage could compromise interior finishes, necessitate expensive remediation, and impact tenant health and safety.
Beyond the immediate financial impact, skipping checks damages reputation. Repeated rework and compromised quality lead to client dissatisfaction, negative reviews, and a loss of trust. A contractor known for cutting corners quickly loses opportunities and struggles to attract skilled labor.
The savings from neglected checks are invariably dwarfed by the cost of remediation, delays, legal fees, and reputational damage. A proactive, detail-oriented approach, powered by a robust checklist, is not just good practice-it's the financially responsible one. It's an investment in project success, client satisfaction, and long-term business health.
Your Free Operation & Functionality Checklist Template: A Sneak Peek
Want to get started building your own robust Operation & Functionality Checklist right away? We're giving you a sneak peek at a simplified version to illustrate the structure and level of detail we recommend.
This preview covers the Site Preparation & Excavation, Foundation & Concrete Work, and Structural Framework phases. It includes essential checks, responsible party designations, and a space for documenting findings and corrective actions.
What You've Got:
- Phase Breakdown: A clear outline of key construction stages.
- Checklist Items: Example verification points for each phase.
- Responsible Party Column: Easily assign accountability for each check.
- Findings & Actions Column: Space to record results and document corrective measures.
Please remember: This is a preview. A comprehensive checklist will need to be tailored to your specific project, incorporating local codes, design specifications, and environmental regulations. Consider it a solid foundation upon which to build your own project-specific masterpiece. We encourage you to download it, adapt it, and put it to work!
Phase 1: Site Preparation - Laying the Groundwork
Before a single beam is raised or a wall is built, meticulous site preparation is absolutely essential. This initial phase dictates the stability, safety, and long-term performance of the entire project. Rushing or overlooking details here can lead to costly remediation down the line.
The first step typically involves thorough site surveying and layout. Accurate marking of property lines, building footprint, and utility locations is paramount. "Call Before You Dig" services are non-negotiable - confirming the precise location of underground utilities prevents potentially dangerous and disruptive accidents. Improper utility marking can lead to service disruptions, damage to infrastructure, and significant delays.
Next comes clearing and grubbing, removing existing vegetation, debris, and obstructions. Topsoil, if suitable, should be carefully stripped and stockpiled for later reuse in landscaping. Following clearing, excavation begins, shaping the site to the required elevations. Excavation depths and slopes must be verified against design specifications, ensuring proper foundation support.
Crucially, erosion and sediment control measures are implemented and actively monitored. Silt fences, hay bales, and sediment basins help prevent soil loss and protect nearby water bodies. Regular inspections are vital to ensure these measures remain effective, especially during rainfall events. Finally, a compacted base course is often installed to provide a stable working surface and to aid in drainage. Proper compaction is critical - inadequate compaction can lead to settling and cracking later in the project lifecycle. All site preparation activities should be documented with photographic evidence and signed-off checklists to ensure accountability and traceability.
Phase 2: Foundation & Concrete - Building a Solid Base
The foundation is more than just the first poured concrete; it's the bedrock of your entire project. A compromised foundation can lead to structural instability, cracking, and costly repairs down the line. This phase demands meticulous attention to detail and strict adherence to engineering specifications.
Key Checks & Considerations:
- Formwork Integrity: Before any concrete is poured, thoroughly inspect the formwork. Ensure it's accurately aligned, securely braced, and capable of withstanding the concrete's weight and pressure. Deviations from the design plan must be corrected immediately.
- Reinforcement Placement: Reinforcing steel (rebar) provides crucial tensile strength to the concrete. Verify that the rebar is correctly sized, spaced, and tied according to the structural engineer's drawings. Overlap lengths and bar supports are critical; don't skip these!
- Concrete Mix Design: The concrete mix must meet the specified strength and durability requirements. This includes verifying the proportions of cement, aggregates, and admixtures. Request and review the concrete testing reports from the supplier before the pour.
- Pouring & Consolidation: Proper placement and consolidation of the concrete are essential to eliminate air voids and ensure uniform strength. Vibrating the concrete is usually necessary to achieve this. Avoid segregation of aggregates during placement.
- Curing Process: Curing is the process of maintaining adequate moisture and temperature to allow the concrete to hydrate properly and reach its design strength. Proper curing prevents cracking and increases the lifespan of the foundation. Follow the curing plan meticulously - this often involves applying wet burlap, using curing compounds, or both.
- Dimensional Accuracy: After the concrete has cured sufficiently, verify that the foundation dimensions match the design specifications. Correct any discrepancies immediately.
- Waterproofing & Drainage: A robust waterproofing system and effective drainage are crucial to protect the foundation from water damage. Ensure the waterproofing membrane is properly applied and that drainage systems are functioning correctly.
Phase 2.5: MEP Rough-in - Early Stage Coordination
The MEP (Mechanical, Electrical, and Plumbing) rough-in phase is often a critical bottleneck in construction projects. While it technically follows the structural framework, performing early-stage coordination before extensive rough-in begins can prevent costly rework and delays. This "Phase 2.5" is about proactive problem-solving, not just reactive fixes.
The goal of this phase is to identify and resolve clashes between MEP systems and other building elements before any permanent installations occur. This involves a thorough review of shop drawings, 3D models (BIM), and on-site conditions. It's not enough to simply follow the design; the team needs to critically assess its feasibility and practicality within the existing building environment.
Key Activities & Checks:
- Clash Detection Review: Dedicated time to rigorously review clash detection reports generated from BIM models, addressing conflicts before they become physical problems.
- Shop Drawing Coordination Meeting: A collaborative meeting involving the MEP subcontractors, architect, and engineer to discuss shop drawings and potential issues.
- Field Verification: A physical walkthrough of the site to verify dimensions, clearances, and access routes for MEP installations. This is particularly crucial for complex systems like HVAC ductwork and electrical conduit runs.
- Accessibility Assessment: Confirming adequate access for future maintenance and repairs of MEP equipment. Consider potential obstructions and plan accordingly.
- Sequencing Review: Establishing a clear sequence of MEP installation activities to minimize disruption to other trades.
- Material Lead Time Confirmation: Verifying the availability of all necessary MEP materials to avoid delays.
A proactive Phase 2.5 approach reduces risk, improves efficiency, and ultimately contributes to a smoother and more successful overall construction process.
Phase 3: Structural Framework - Raising the Structure
This phase marks a critical shift - the tangible emergence of the building's skeleton. Ensuring the structural framework's integrity is paramount to the entire project's success. Precision and adherence to engineering specifications are non-negotiable.
Key Checks and Considerations:
- Material Certification Verification: Before any lifting or assembly begins, rigorously verify the certification documents for all structural steel, timber, or other materials. These documents confirm the material meets the specified grade and quality. Don't proceed without proper certification.
- Connection Integrity - The Foundation of Strength: Connections - welds, bolts, rivets - are the weakest points if compromised. Each connection must be visually inspected and, where required by engineering drawings, subjected to non-destructive testing (NDT) such as ultrasonic testing (UT) or radiographic testing (RT). Maintain detailed records of all NDT results.
- Dimensional Accuracy & Alignment: As sections of the framework are erected, constant verification of dimensions and alignment against the approved shop drawings is vital. Use calibrated laser levels and measuring tools. Discrepancies, even seemingly minor ones, must be immediately addressed and corrected.
- Plumb, Level, and Square: Ongoing checks for plumb, level, and square are essential during erection. Deviations from these parameters can compound into significant structural issues later on. Implement a rigorous quality control process involving multiple layers of inspection.
- Temporary Bracing & Support: Properly installed and maintained temporary bracing and support systems are crucial to prevent collapse or instability during erection. Ensure these systems are designed by a qualified engineer and are regularly inspected.
- Fall Protection & Safety Protocols: Working at height demands the highest level of safety. Rigorous enforcement of fall protection protocols, including harnesses, guardrails, and safety netting, is mandatory. Conduct daily safety briefings and toolbox talks.
- Crane Operation & Load Capacity: Crane operation must adhere strictly to safety regulations and load capacity limits. Qualified and certified crane operators are essential. Regularly inspect crane rigging and ensure proper load distribution.
- Geotechnical Monitoring (if applicable): If the project is on unstable ground or requires specific geotechnical considerations, continuous monitoring of soil conditions and structural settlement is imperative.
Phase 3.5: Insulation and Vapor Barrier Installation
Often overlooked as a "minor" detail, proper insulation and vapor barrier installation are critical for building performance, energy efficiency, and long-term structural health. This phase directly impacts a building's ability to maintain comfortable temperatures, prevent moisture damage, and reduce energy consumption.
Why It Matters: Incorrectly installed insulation can lead to heat loss/gain, increased energy bills, and discomfort. A poorly installed vapor barrier can trap moisture within wall cavities, leading to mold growth, rot, and structural deterioration.
Key Installation Considerations:
- Insulation Type Selection: Choosing the right insulation type (fiberglass, cellulose, spray foam, rigid board) depends on climate, budget, and design requirements. Refer to the project specifications for the designated type.
- R-Value Requirements: Ensure the installed insulation meets the specified R-value as dictated by local codes and energy efficiency standards.
- Continuous Insulation: Prioritize continuous insulation where possible to minimize thermal bridging.
- Vapor Barrier Placement: Accurate placement of the vapor barrier is paramount. Consider climate zone and wall assembly configuration - typically, it's installed on the warm-in-winter side of the wall.
- Sealing Air Leaks: Meticulously seal all seams, penetrations, and joints in both the insulation and vapor barrier to prevent air infiltration. Pay particular attention to window and door openings.
- Proper Fastening & Overlap: Follow manufacturer's instructions regarding fastening techniques and overlap requirements for vapor barrier installation.
- Inspection & Testing: Conduct a thorough inspection of the installed insulation and vapor barrier, checking for gaps, tears, and improper fastening. Consider blower door testing to identify air leakage.
- Moisture Management: Always consider the overall moisture management strategy of the building and ensure this phase aligns with that strategy.
Phase 4: Interior Finishes - Polishing the Project
Interior finishes are where a building truly comes to life, transforming a structural shell into a functional and aesthetically pleasing space. This phase requires meticulous attention to detail, as even minor imperfections can significantly impact the overall impression. Our checklist for interior finishes focuses on ensuring quality, consistency, and adherence to design specifications.
Wall & Floor Covering Installation: This goes beyond simply adhering materials; it's about ensuring a flawless finish. We verify proper adhesive application, alignment accuracy (critical for patterns!), and consistent joint treatment. Expect checks for lippage, bubbling, and proper sealing at transitions.
Ceiling Installation: Beyond a flat surface, we're looking for secure attachment, no visible gaps, and evenness of finish. This includes inspecting suspended ceilings, drywall finishes, and any decorative elements.
Door & Window Installation: Functionality is key. Doors and windows must operate smoothly, latch securely, and be properly sealed to prevent air and water infiltration. We're also assessing alignment and aesthetic appeal.
Painting & Finishing: This is more than just applying color. We confirm uniform coating thickness, proper surface preparation (priming!), and consistent color matching. Expect scrutiny for brush marks, drips, and overall finish quality. Special attention is given to trim and detail work.
Specific Material Considerations: The checklist will be tailored to the specific materials used. For example, a tile installation will have its own set of verification points including grout joint consistency, tile spacing, and waterproofing membrane integrity. Likewise, wood flooring installations will require checks for cupping, warping, and proper acclimation.
Ultimately, Phase 4 is about creating a polished and refined environment that reflects the project's overall quality and design intent.
Phase 5: Accessibility and Safety - Ensuring a Secure Environment
Construction sites, by their nature, present inherent risks. However, a proactive approach to accessibility and safety isn't just about mitigating those risks; it's about creating a respectful and inclusive environment for everyone - workers, visitors, and future occupants of the building. This phase goes beyond simply complying with regulations; it demonstrates a commitment to well-being.
Accessibility Considerations:
Adhering to the Americans with Disabilities Act (ADA) and local accessibility codes is paramount. This extends beyond just ensuring ramps and accessible restrooms are present. It's about the entire user experience. We'll be verifying:
- Clear and Level Pathways: Ensuring all routes are free of obstructions and have consistent slopes.
- Accessible Entrances: Door widths, maneuvering clearances, and accessible hardware.
- Accessible Restrooms: Appropriate fixture heights, grab bars, and signage.
- Accessible Parking: Designated accessible parking spaces located close to entrances.
- Signage: Clear and consistent signage using appropriate tactile and visual cues.
Safety Protocols & Hazard Mitigation:
Our commitment to safety encompasses ongoing monitoring and continuous improvement. This phase includes a thorough review of:
- Fall Protection: Ensuring proper guardrails, harnesses, and netting are in place and utilized at all elevated work areas. Regular inspections of fall protection equipment are critical.
- Electrical Safety: Identifying and mitigating electrical hazards, ensuring proper grounding, and using GFCI protection where necessary.
- Traffic Management: Establishing clear pedestrian walkways and designated vehicle routes to minimize the risk of accidents.
- Hazard Communication: Implementing a comprehensive hazard communication program, including Safety Data Sheets (SDS) and proper labeling of chemicals.
- Emergency Preparedness: Regular drills for fire evacuation and other emergencies, ensuring all personnel are familiar with procedures and escape routes.
- Housekeeping: Maintaining a clean and organized site to prevent slips, trips, and falls.
- Regular Inspections: Consistent and documented safety inspections to identify and correct potential hazards proactively.
Ultimately, fostering a culture of safety is everyone's responsibility. Open communication, continuous training, and a proactive mindset are crucial to creating a secure and accessible environment for all.
Beyond the Checklist: Best Practices for Implementation
A checklist is a powerful tool, but its effectiveness hinges entirely on how it's used. Simply ticking boxes isn't enough; it requires a commitment to consistent, thoughtful application. Here's how to move beyond the basic checklist and truly integrate it into your project's operational flow.
Foster a Culture of Ownership: The best checklists are embraced, not imposed. Encourage team members at all levels to contribute to the checklist's development and to take ownership of their assigned checks. When people feel invested, they're more likely to be diligent and proactive.
Regular Review and Updates: Construction is dynamic. Plans change, materials evolve, and unexpected challenges arise. Schedule regular review sessions (weekly, bi-weekly) to evaluate the checklist's relevance and update it accordingly. This ensures it remains a living document that accurately reflects the project's current status.
Training and Communication: Provide thorough training on the checklist's purpose and procedures. Clearly communicate expectations and responsibilities. Use the checklist as a springboard for broader discussions about quality, safety, and best practices.
Embrace Technology: Consider leveraging digital checklist platforms. These offer real-time access, automated reporting, photo documentation capabilities, and often integrate with other project management tools, drastically improving efficiency and accuracy.
Focus on Root Cause Analysis: When discrepancies or issues are identified, don't just correct the problem; investigate the underlying cause. Is there a training gap? A design flaw? A material defect? Addressing the root cause prevents recurrence and improves overall project quality.
Promote Open Communication: Create an environment where team members feel comfortable raising concerns and reporting potential problems. A culture of open communication fosters proactive issue resolution and prevents minor issues from escalating into major setbacks.
Continuous Improvement: View the checklist as a foundation for continuous improvement. Regularly solicit feedback from the team and use that feedback to refine the checklist and improve processes. A commitment to continuous improvement will lead to more efficient workflows and higher-quality results.
Conclusion: Building Success, One Check at a Time
Ultimately, a construction project isn't just about the finished product; it's about the journey - a journey navigated with precision, foresight, and a commitment to excellence. This Operation & Functionality Checklist isn't a burden, but a roadmap to that success. It's a framework for proactive problem-solving, a shield against costly errors, and a testament to the dedication of every team member involved. By embracing this systematic approach, you're not just building structures; you're building trust - trust with clients, trust with stakeholders, and, most importantly, trust in the robust foundation of your own work. Remember, consistently applied, this checklist transforms from a simple document into a powerful tool, ensuring that every step, every detail, contributes to a project that stands the test of time and exceeds expectations.
Resources & Links
- Construction Industry Council (CIC): Provides guidance, best practices, and resources for the UK construction industry. Useful for understanding industry standards and regulations that often inform checklist creation.
- Occupational Safety and Health Administration (OSHA): Essential for the 'Accessibility and Safety' section. Provides comprehensive safety regulations and guidelines critical for construction site checklists.
- Federal Emergency Management Agency (FEMA): Resources on disaster preparedness and resilience, which can inform checklist items related to site preparation and structural integrity in areas prone to natural disasters.
- Building Science Corporation: Offers technical expertise and resources on building science principles, particularly relevant for 'Insulation and Vapor Barrier Installation' and overall building performance.
- National Association of Home Builders (NAHB): Provides resources and best practices for residential construction, which can be helpful for understanding common construction processes and quality control procedures.
- Associated General Contractors of America (AGC): Provides advocacy, education, and resources for the construction industry. Good for understanding project management and workflow best practices.
- International Organization for Standardization (ISO): Information on ISO standards, particularly ISO 9001 (quality management) which is relevant for establishing and maintaining robust checklists and process control.
- Building Sustainable Network: Provides resources for sustainable building practices. Relevant for sections about environmental considerations during site preparation and material selection.
- Concrete Construction Magazine: A resource specifically focused on concrete construction techniques, issues, and best practices, useful for the 'Foundation & Concrete' phase.
- MEP Today: Focuses on mechanical, electrical, and plumbing (MEP) systems. Valuable for providing context and understanding around the 'MEP Rough-in' phase. May offer articles on coordination and best practices.
- ASHRAE: American Society of Heating, Refrigerating and Air-Conditioning Engineers. Important for the 'Insulation and Vapor Barrier Installation' and ventilation system checklists.
Frequently Asked Questions
What is this checklist template for?
This checklist template is designed to help construction businesses streamline their operations and ensure consistent functionality across projects. It covers key areas from pre-construction planning to project closeout, helping to identify potential issues and improve efficiency.
Is this checklist template actually free?
Yes! We're committed to providing valuable resources for construction professionals. This checklist is completely free to download and use. No signup or payment is required.
What kind of projects is this checklist suitable for?
The checklist is designed to be adaptable to a wide range of construction projects, from small renovations to large-scale commercial builds. It can be customized to suit the specific needs of each project.
How do I access and download the checklist?
Simply click on the download link provided in the article. The checklist will be available in a commonly used format (e.g., Excel, PDF) that you can then download to your computer.
Can I customize the checklist?
Absolutely! The checklist is intended to be a starting point. We encourage you to modify it, add or remove items, and tailor it to your company's specific processes and project requirements.
Is this checklist a replacement for professional construction management software?
No. This checklist is a supplementary tool to help organize and track essential aspects of your project. It's not a substitute for comprehensive construction management software, but it can be a helpful starting point for smaller projects or companies with limited resources.
Found this Article helpful?
Construction Management Solution Demo
Build smarter, not harder! ChecklistGuro streamlines construction projects from planning to closeout. Manage tasks, inspections, safety protocols & more - all in one place. Reduce delays, improve communication, and deliver projects on time & on budget.
Related Articles

The Ultimate Concrete Vibration Checklist Template

Unlock Value: Your Free Value Engineering Checklist Template

The Ultimate HVAC Ductwork Installation Checklist Template

The Ultimate Rebar Placement Checklist Template

Your Concrete Mix Design Verification Checklist: A Step-by-Step Guide

Backfilling & Compaction Checklist: A Foundation's Best Friend

The Ultimate Concrete Delivery & Placement Checklist Template

Your Ultimate Stakeholder Communication Plan Checklist Template
We can do it Together
Need help with
Construction?
Have a question? We're here to help. Please submit your inquiry, and we'll respond promptly.